> ## Documentation Index
> Fetch the complete documentation index at: https://docs.devinenterprise.com/llms.txt
> Use this file to discover all available pages before exploring further.
# Classic configuration
> Configure Devin's environment through the classic interactive wizard.
Looking for declarative configuration? See [Declarative configuration (blueprints)](/onboard-devin/environment/blueprints) for the recommended approach for new setups.
Devin operates by loading a snapshot of a virtual machine at the start of each session. For Devin to be most effective, this snapshot should include all the repositories you want Devin to work on, as well as any tools or dependencies Devin might need to work on your codebase. This way, Devin can focus on writing code instead of having to set up its environment every time!
In this guide, we'll go over how to onboard Devin onto one of your repositories and configure Devin's environment (the virtual machine snapshot). You can think of this as setting up Devin's laptop on the first day of work.
Setting up Devin's environment correctly will significantly improve Devin's
performance on your codebase. Imagine if every time you started a task, your
laptop and part of your memory were wiped--that's what happens to Devin with
an incorrect or incomplete setup!
## Add a repository
First, make sure Devin has access to your repositories. Repositories can be added at any point by configuring Devin's access in:
* **Teams**: [Settings > Connections](https://app.devin.ai/settings/connections)
* **Enterprise**: [Enterprise Settings > Integrations](https://app.devin.ai/settings/connected-accounts)
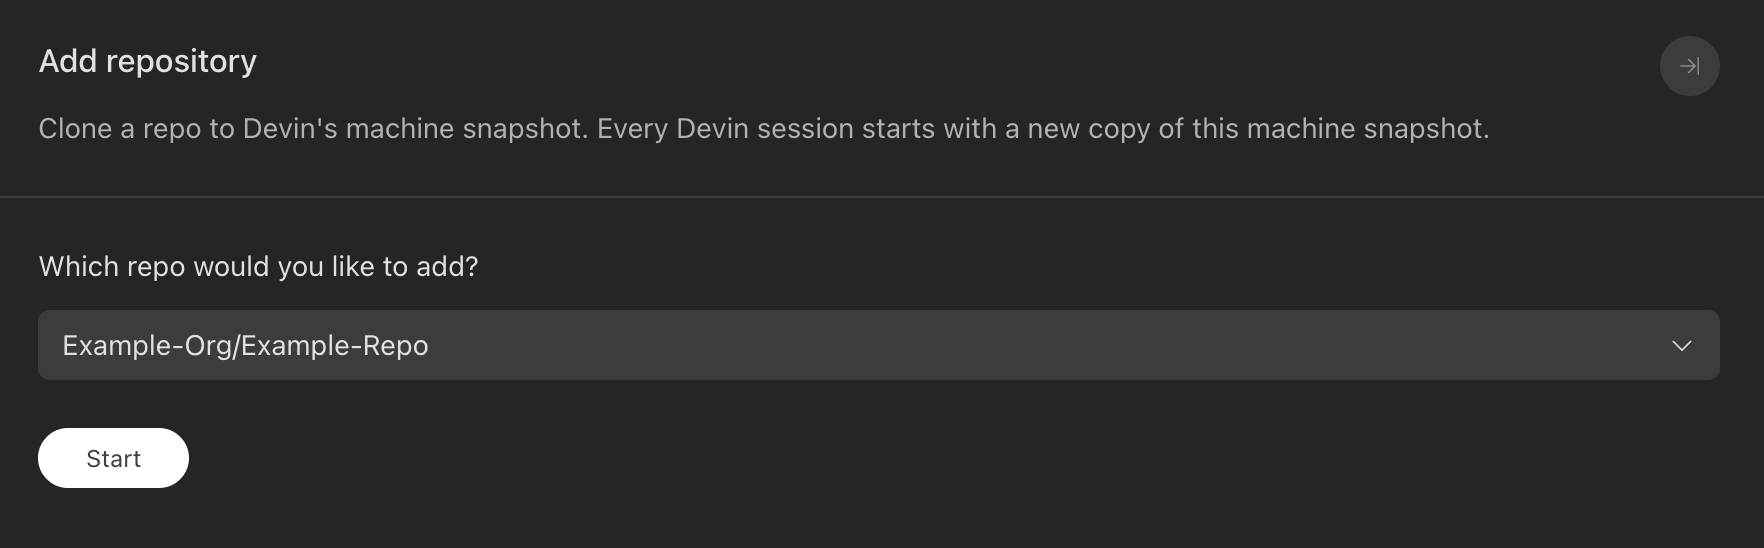
Now, within an Organization, go to [Devin's Machine](https://app.devin.ai/machine) and click **Add repository**. Select the repositories you want to add to Devin's environment, then click **Start** to begin configuring them.
 Devin's machine is running Ubuntu 22.04 (x86\_64). Try pressing Ctrl+K in the terminal to automatically generate an installation command.
## Set Up the Repository and Development Environment
Once in Repo Setup, you will see three panels:
1. **Repository Setup Steps**: Displays all 8 setup steps in order, along with the resulting commands that will be saved to your configuration.
2. **Devin AI Setup Agent**: Devin can suggest what to do for each step based on your specific repository and iterate on the setup until it's ready to be saved.
3. **VSCode Terminal**: Gives you the ability to run any commands or browse the file system directly in the embedded VSCode environment.
### AI-Generated Suggestions
When you add a repository, Devin automatically generates setup suggestions for each step based on analysis of your codebase. You can accept or reject each suggestion individually, or iterate on them with the Devin AI Setup Agent.
### Repository Setup Steps
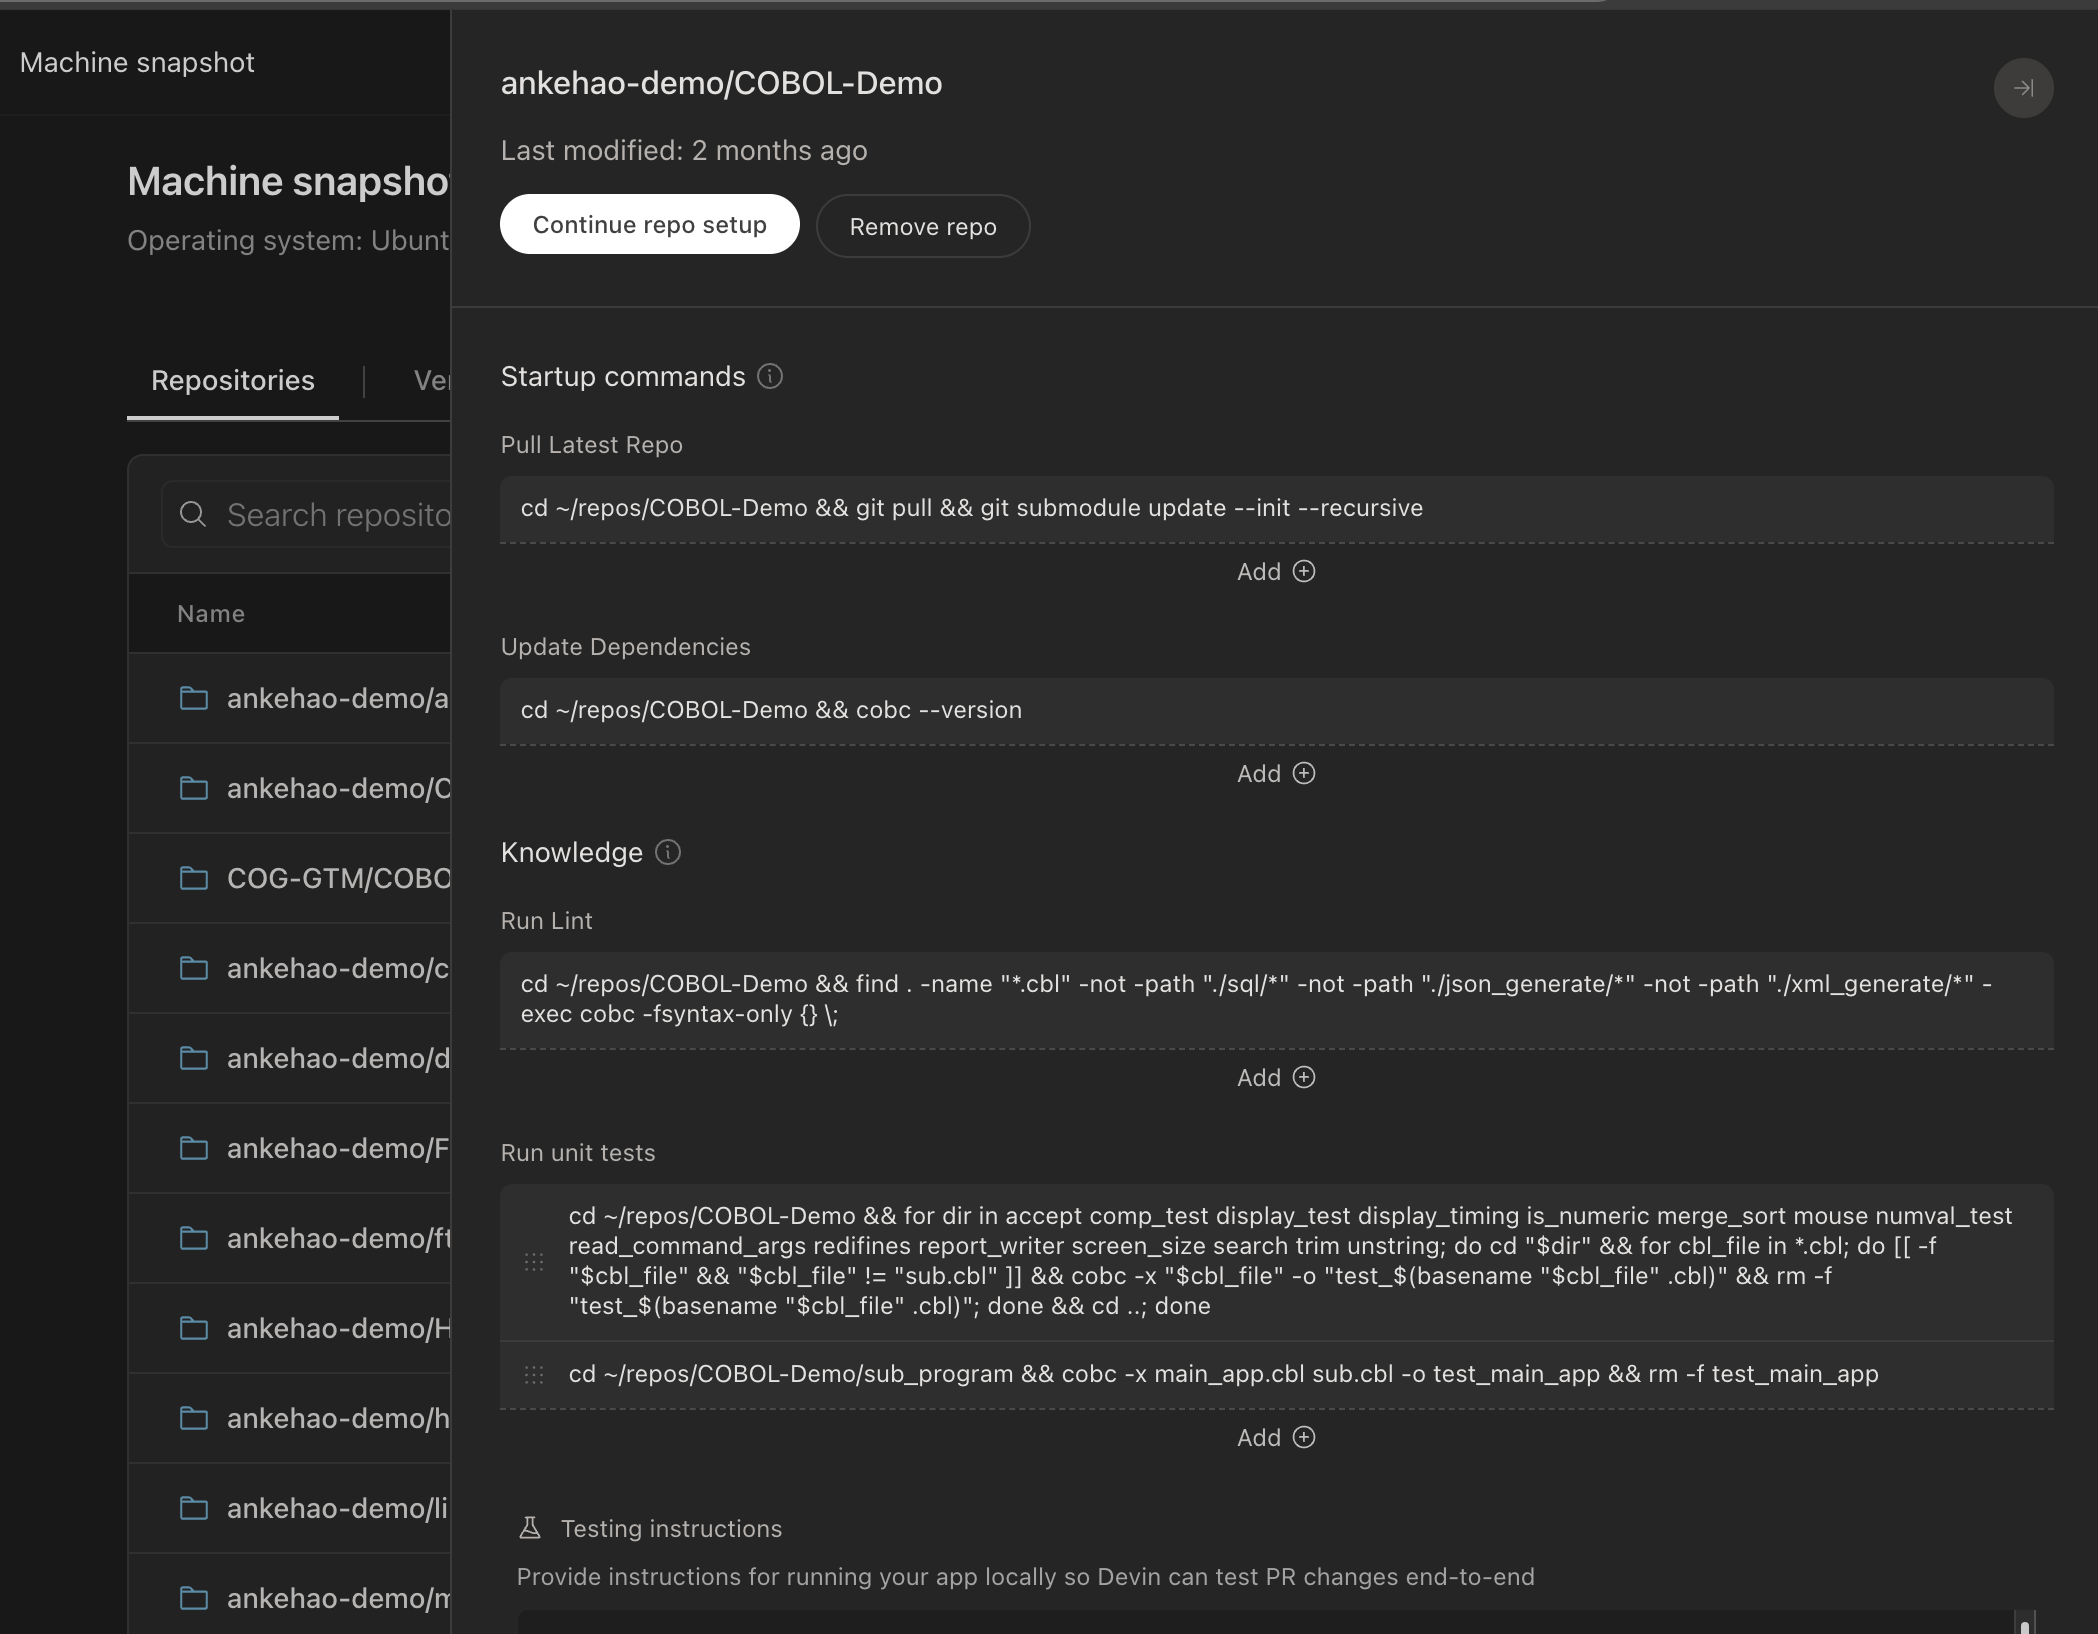
The command Devin runs at the start of each session to pull the latest changes from the repository. In most cases, you should keep the default command. Make sure that Devin has access to any submodules in the repository.
Set up any secrets or environment variables Devin needs to work with your repository. See [Configuring Secrets](#configuring-secrets) for more details.
Commands to install the initial dependencies for your repository. This runs once during setup to prepare Devin's environment.
Commands Devin runs after git pull during session startup in case new dependencies were added. This should typically be the same command you use to install dependencies (e.g. `npm install`, `pip install -r requirements.txt`, etc.).
Commands Devin should use to run lint or check for syntax errors. Devin will look at the output of these commands before committing changes.
Commands Devin should use to run tests. Like with the lint commands, Devin will look at the output of these commands before committing changes.
Let Devin know how to run your code locally. This is useful if Devin needs to run your code to test or debug changes. You can use Devin's browser to log in to websites you want Devin to use. Add login credentials to [secrets](/product-guides/secrets) if the login times out.
Add any additional instructions for Devin when working on this repository.
### Finish or Save Setup
Once you are satisfied with the setup, click **Finish Setup** to save the setup. This will then replay all the commands in the setup steps to prepare Devin's environment.
If you are not finished with your changes, click **Finish Later** to save the setup. This will keep the setup in progress and allow you to come back to it later. However, note that **only one setup can be in progress at a time**, so we do not suggest using this option unless absolutely necessary.
**Tips for setting up commands:**
* Run commands in the VS Code terminal first to induce caching before verifying.
* If a command needs to run in a specific directory, use `cd` like so: `cd && `.
* If your project doesn't have a lint command, you can include your build command so Devin checks for compilation errors.
* If the lint or test procedure for your project is complex, you can skip those steps and explain them to Devin in the Additional Notes step.
* Check out the [troubleshooting section](#troubleshooting) if you encounter issues with verifying your commands.
## Configure Previously Added Repositories
You can always edit or add a new repo in [Settings > Devin's Machine](https://app.devin.ai/machine).
To edit an existing repo, click **Configure** on the top right of the page, Add/Modify/Remove repo, select the repo you want to edit, and click submit
Devin's machine is running Ubuntu 22.04 (x86\_64). Try pressing Ctrl+K in the terminal to automatically generate an installation command.
## Set Up the Repository and Development Environment
Once in Repo Setup, you will see three panels:
1. **Repository Setup Steps**: Displays all 8 setup steps in order, along with the resulting commands that will be saved to your configuration.
2. **Devin AI Setup Agent**: Devin can suggest what to do for each step based on your specific repository and iterate on the setup until it's ready to be saved.
3. **VSCode Terminal**: Gives you the ability to run any commands or browse the file system directly in the embedded VSCode environment.
### AI-Generated Suggestions
When you add a repository, Devin automatically generates setup suggestions for each step based on analysis of your codebase. You can accept or reject each suggestion individually, or iterate on them with the Devin AI Setup Agent.
### Repository Setup Steps
The command Devin runs at the start of each session to pull the latest changes from the repository. In most cases, you should keep the default command. Make sure that Devin has access to any submodules in the repository.
Set up any secrets or environment variables Devin needs to work with your repository. See [Configuring Secrets](#configuring-secrets) for more details.
Commands to install the initial dependencies for your repository. This runs once during setup to prepare Devin's environment.
Commands Devin runs after git pull during session startup in case new dependencies were added. This should typically be the same command you use to install dependencies (e.g. `npm install`, `pip install -r requirements.txt`, etc.).
Commands Devin should use to run lint or check for syntax errors. Devin will look at the output of these commands before committing changes.
Commands Devin should use to run tests. Like with the lint commands, Devin will look at the output of these commands before committing changes.
Let Devin know how to run your code locally. This is useful if Devin needs to run your code to test or debug changes. You can use Devin's browser to log in to websites you want Devin to use. Add login credentials to [secrets](/product-guides/secrets) if the login times out.
Add any additional instructions for Devin when working on this repository.
### Finish or Save Setup
Once you are satisfied with the setup, click **Finish Setup** to save the setup. This will then replay all the commands in the setup steps to prepare Devin's environment.
If you are not finished with your changes, click **Finish Later** to save the setup. This will keep the setup in progress and allow you to come back to it later. However, note that **only one setup can be in progress at a time**, so we do not suggest using this option unless absolutely necessary.
**Tips for setting up commands:**
* Run commands in the VS Code terminal first to induce caching before verifying.
* If a command needs to run in a specific directory, use `cd` like so: `cd && `.
* If your project doesn't have a lint command, you can include your build command so Devin checks for compilation errors.
* If the lint or test procedure for your project is complex, you can skip those steps and explain them to Devin in the Additional Notes step.
* Check out the [troubleshooting section](#troubleshooting) if you encounter issues with verifying your commands.
## Configure Previously Added Repositories
You can always edit or add a new repo in [Settings > Devin's Machine](https://app.devin.ai/machine).
To edit an existing repo, click **Configure** on the top right of the page, Add/Modify/Remove repo, select the repo you want to edit, and click submit
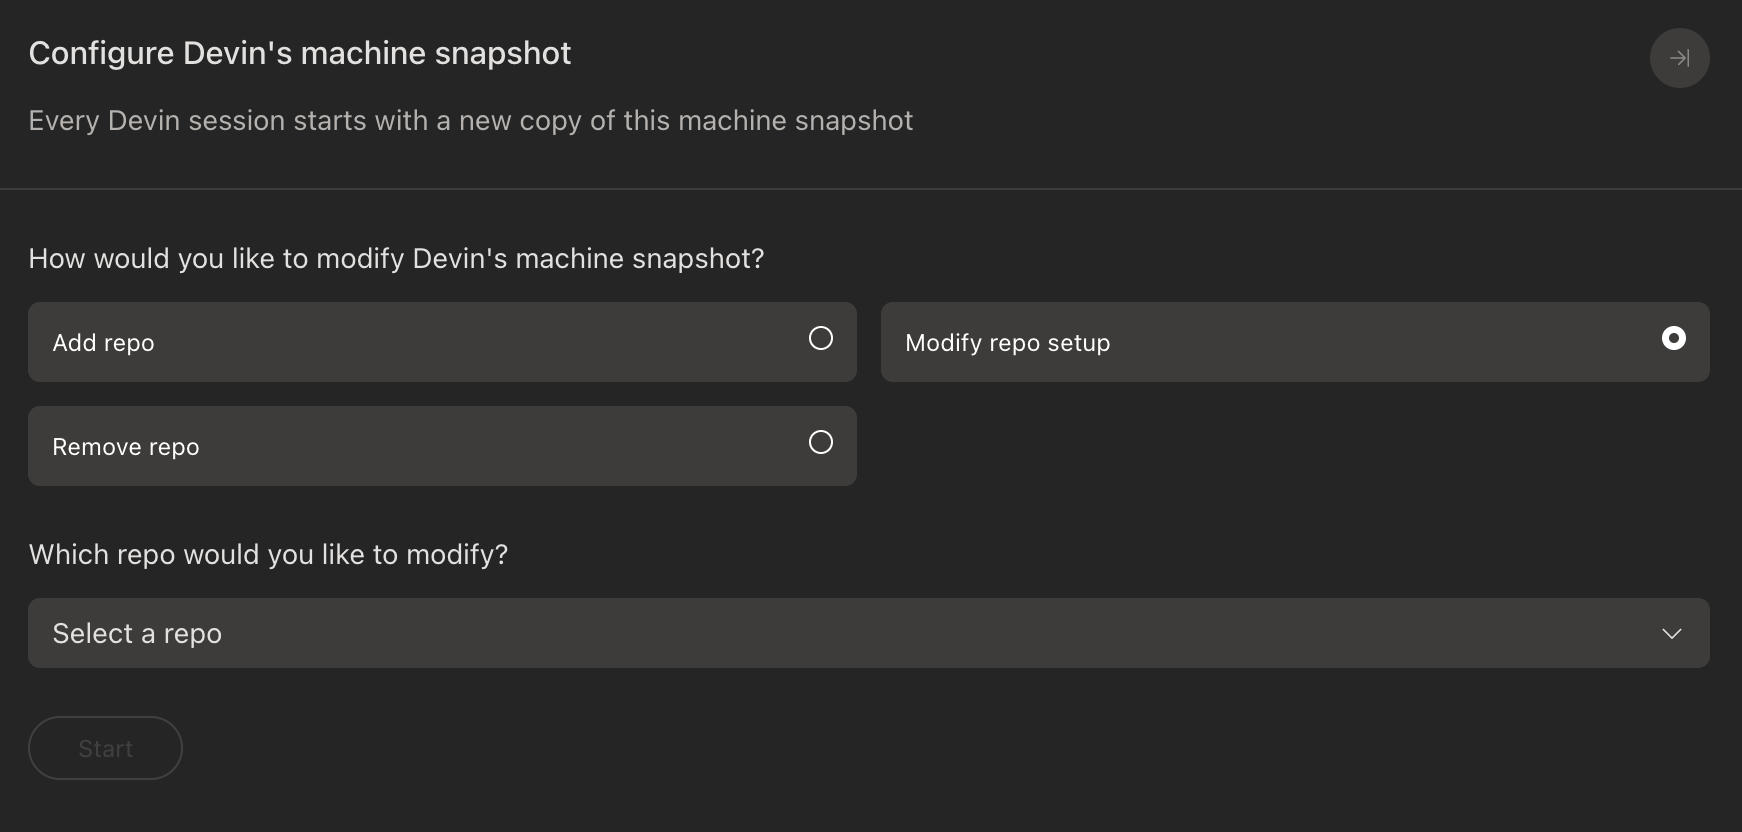 Alternatively, you can select the existing repo you want to edit from the list and click **Modify repo setup** to edit the setup steps.
 ### Machine Version History
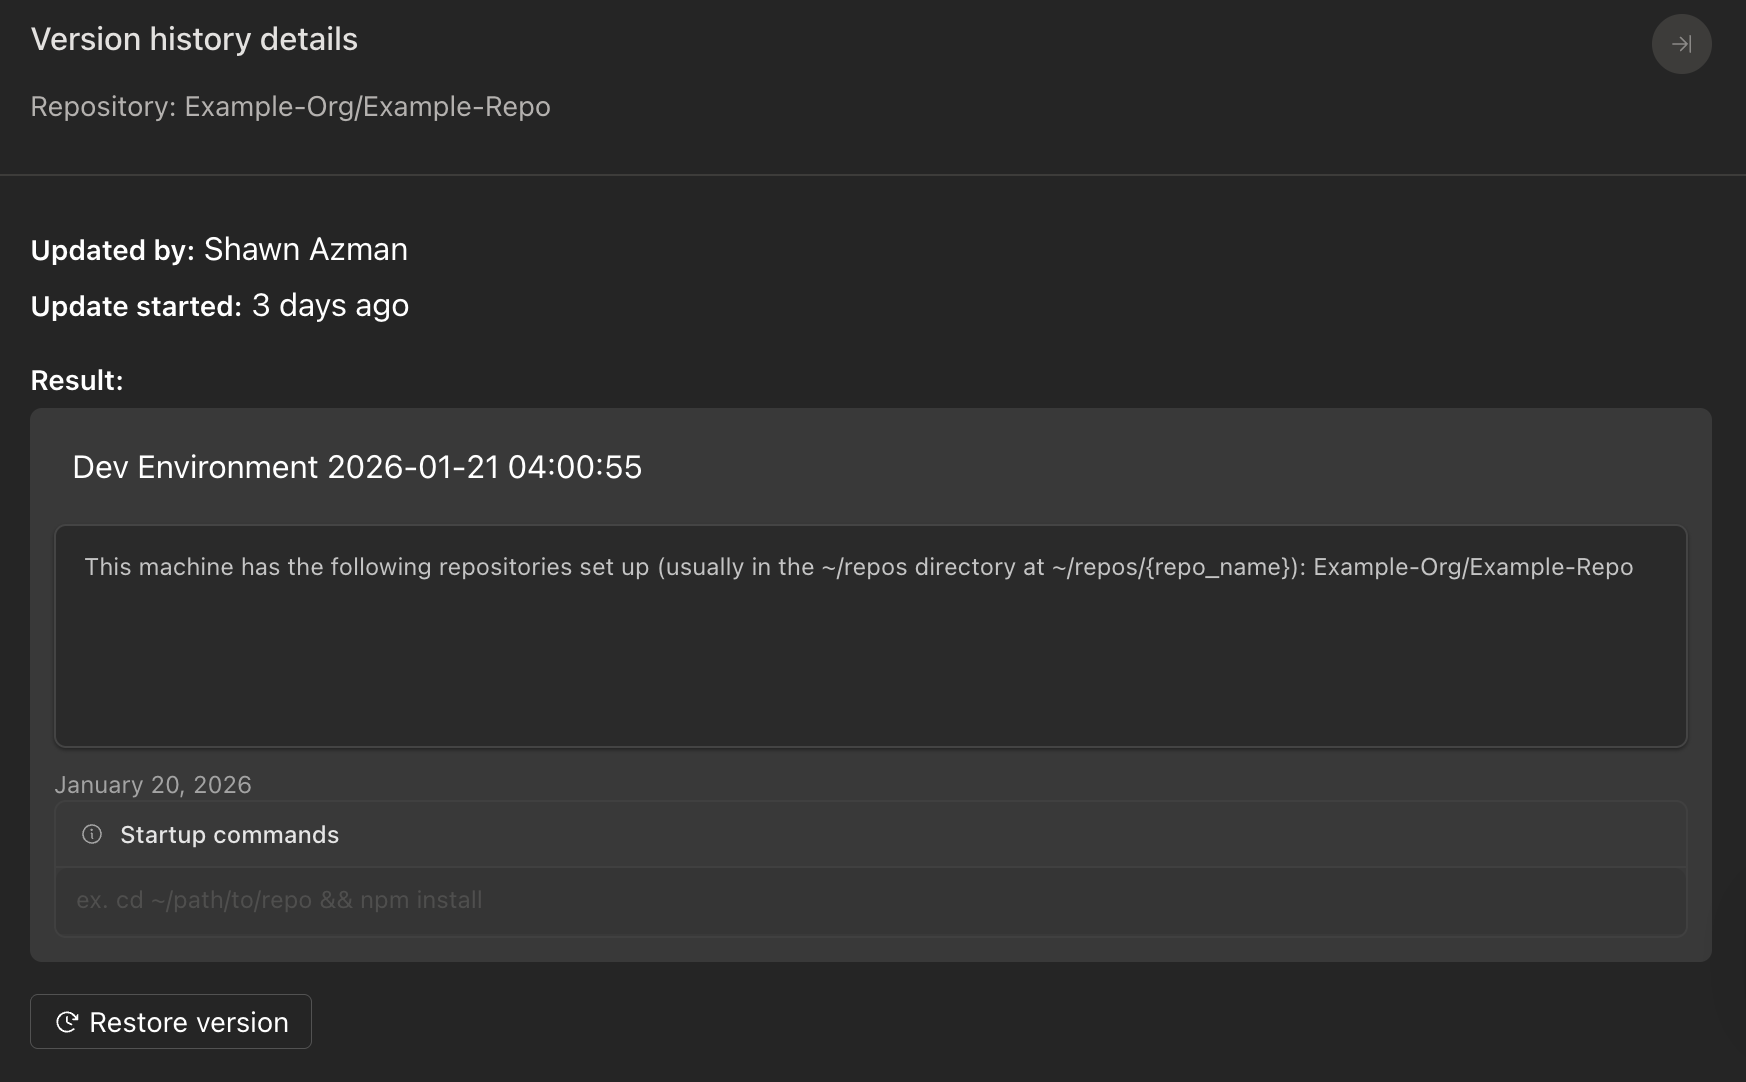
If during setup you accidentally introduce a breaking change, you can revert to a previous environment snapshot. Go to [Settings > Devin's Machine](https://app.devin.ai/machine), switch to the **Version History** tab, and restore a previous snapshot that you know worked correctly.
### Machine Version History
If during setup you accidentally introduce a breaking change, you can revert to a previous environment snapshot. Go to [Settings > Devin's Machine](https://app.devin.ai/machine), switch to the **Version History** tab, and restore a previous snapshot that you know worked correctly.
 ## Configuring Secrets
Secrets such as API keys, passwords, and tokens can be added in the [secrets](/product-guides/secrets) dashboard. When possible, we recommend using a `.env` file in Devin's environment with [`direnv`](https://direnv.net/) to manage environment variables automatically. See the [configuring environment variables example](#configuring-environment-variables) below for details.
## Examples
Below are some examples of how to set up Devin's environment for different use cases.
Since Devin runs all commands using bash, one common pattern is to edit the `~/.bashrc` file to automatically set up Devin's shell. You can run `devin ~/.bashrc` in the terminal to edit the file in VS Code.
### Configuring Environments Automatically for Different Repositories
After Apr 24 2025, teams who sign up for Devin should see the `custom_cd`
section already in their `~/.bashrc`. You will then just need to update the
section for your own repos.
Say you have two repositories that require different versions of Node, and you want Devin to automatically use the right version for each repository. We'll use [`nvm`](https://github.com/nvm-sh/nvm) to install and manage the Node versions. `nvm` should already be installed in Devin's machine.
First, we'll install the two versions of Node by running the following commands in the VS Code terminal:
```bash theme={null}
nvm install 18
nvm install 20
```
Next, open up `~/.bashrc` by running `devin ~/.bashrc` in the terminal. Append the following to `~/.bashrc`.
```bash theme={null}
function custom_cd() {
builtin cd "$@"
if [[ "$PWD" == "$HOME/repos/node18"* ]]; then
nvm use 18 >/dev/null 2>&1
elif [[ "$PWD" == "$HOME/repos/node20"* ]]; then
nvm use 20 >/dev/null 2>&1
fi
}
alias cd='custom_cd'
cd $PWD
```
This will run `nvm use 18` whenever Devin is in the `node18` repo and `nvm use 20` whenever Devin is in the `node20` repo.
### Configuring Environment Variables
[`direnv`](https://direnv.net/) is pre-installed on Devin's machine and can be used to manage environment variables per repository. The direnv hook is already configured in `~/.bashrc`.
To set up environment variables for a repository, create a `.envrc` file in the root of the repository. For example:
```bash theme={null}
export ENV_VAR=1
export ANOTHER_ENV_VAR=2
```
Finally, we'll run `direnv allow` in the terminal to load the environment variables.
Devin will now have the environment variables in our `.envrc` file added to its environment when working in our repository in future sessions.
We recommend adding `.envrc` to your `.gitignore` file so that Devin doesn't
accidentally commit it to the repository.
### Adding Directories to the System PATH
We can edit `~/.bashrc` to add directories to the system PATH. This will make it easier for Devin to run the executables in those directories. For example, we can append the following to `~/.bashrc` which will add the `~/bin` directory to the system PATH.
```bash theme={null}
export PATH="$HOME/bin:$PATH"
```
Now, Devin will be able to run the executables in the `~/bin` directory without having to specify the full path.
## Logging In to Websites
During environment setup, you can use the Browser tab to log in to any website that you want Devin to interact with. These session cookies will be stored in Devin's environment and will be available to Devin in future sessions. If you are using a website that times out your login frequently, you will also want to set Devin up with credentials in your [Secrets](/product-guides/secrets) dashboard.
### Scripted Browser Use via Playwright
For apps that require browser-based authentication (SSO, OAuth, etc.) or systematic data entry, Devin can write and run Playwright scripts to automate these flows against its own running browser. You can also write these scripts yourself and check them into your repo. Devin's Chrome browser exposes a **Chrome DevTools Protocol (CDP)** endpoint at `http://localhost:29229` that Playwright can connect to.
```python theme={null}
from playwright.sync_api import sync_playwright
with sync_playwright() as p:
browser = p.chromium.connect_over_cdp("http://localhost:29229")
context = browser.contexts[0]
page = context.pages[0] if context.pages else context.new_page()
# Automate your login flow here
page.goto("https://your-app.com/login")
page.fill('input[name="email"]', "user@example.com")
page.fill('input[name="password"]', "password")
page.click('button[type="submit"]')
page.wait_for_url("**/dashboard")
```
After the script runs, the authenticated session (cookies, localStorage, auth tokens) persists in Devin's browser. Devin can then refresh pages, navigate, and interact with the app normally — the login carries over.
Store login scripts in your repo's `.agents/skills/` directory and reference credentials via [Secrets](/product-guides/secrets) so that Devin can re-authenticate automatically in every session. See [Computer Use — Scripted Browser Use](/work-with-devin/computer-use#scripted-browser-use-via-playwright) for more details.
## Troubleshooting
### Why aren't my commands being verified?
If you run into an error when verifying one of the commands, try to inspect its output and also try to run the command yourself in a fresh terminal.
1. Check the path of the executable you are running. We strongly recommend either using absolute paths or [adding executables to the system PATH](#adding-directories-to-the-system-path).
2. Make sure you've installed the necessary tools and dependencies to run the command. If you haven't, use the Setup Agent or VSCode Terminal to install them, then verify again.
3. Check that the commands are being run in the right directory. If the commands need to run in a specific directory, you can use `cd` like so: `cd && `.
4. Check that you are using the **right language versions** (e.g. right versions of Node, Python, etc.).
5. You might want to **modify your `~/.bashrc`** to automatically use the right environment.
Check out our guide for an example of [how to use the right language version for different repositories](#configuring-environments-automatically-for-different-repositories).
### My commands work when I run them manually
Check that you've setup your bashrc so that a fresh bash shell has access to the necessary tools. Try running your commands in a fresh terminal. If they don't work, you will likely need to edit your bashrc, for example by running certain setup commands or editing the system PATH.
Check out our guide for an example of [how to use the right language version for different repositories](#configuring-environments-automatically-for-different-repositories).
Commands will timeout after 5 minutes. You can induce caching by running the commands in the VS Code terminal before verifying. We do not recommend giving Devin commands that take longer than 5 minutes to run, as it will significantly slow it down.
### Devin can't run my lint/test commands in sessions
Take a look at the output of Devin's terminal to see if you can spot any errors. You can also try running the commands yourself in a fresh terminal to see if they work. If needed, you can revisit the repository setup process to make changes to Devin's environment.
### The git pull step isn't working
Double check that Devin has access to the repository and submodules of the repository. Also check out the [GitHub Integration Documentation](/integrations/gh) if you run into any permission issues.
## All Done!
Congrats! You've onboarded Devin and can start building together. It's time to start [your first session](/get-started/first-run). Keep in mind that Devin works best when you:
* Tell Devin how to check its progress
* Break down big tasks
* Share detailed requirements upfront
* Run multiple sessions in parallel
If you need support please don't hesitate to drop us an email at [support@cognition.ai](mailto:support@cognition.ai).
## Configuring Secrets
Secrets such as API keys, passwords, and tokens can be added in the [secrets](/product-guides/secrets) dashboard. When possible, we recommend using a `.env` file in Devin's environment with [`direnv`](https://direnv.net/) to manage environment variables automatically. See the [configuring environment variables example](#configuring-environment-variables) below for details.
## Examples
Below are some examples of how to set up Devin's environment for different use cases.
Since Devin runs all commands using bash, one common pattern is to edit the `~/.bashrc` file to automatically set up Devin's shell. You can run `devin ~/.bashrc` in the terminal to edit the file in VS Code.
### Configuring Environments Automatically for Different Repositories
After Apr 24 2025, teams who sign up for Devin should see the `custom_cd`
section already in their `~/.bashrc`. You will then just need to update the
section for your own repos.
Say you have two repositories that require different versions of Node, and you want Devin to automatically use the right version for each repository. We'll use [`nvm`](https://github.com/nvm-sh/nvm) to install and manage the Node versions. `nvm` should already be installed in Devin's machine.
First, we'll install the two versions of Node by running the following commands in the VS Code terminal:
```bash theme={null}
nvm install 18
nvm install 20
```
Next, open up `~/.bashrc` by running `devin ~/.bashrc` in the terminal. Append the following to `~/.bashrc`.
```bash theme={null}
function custom_cd() {
builtin cd "$@"
if [[ "$PWD" == "$HOME/repos/node18"* ]]; then
nvm use 18 >/dev/null 2>&1
elif [[ "$PWD" == "$HOME/repos/node20"* ]]; then
nvm use 20 >/dev/null 2>&1
fi
}
alias cd='custom_cd'
cd $PWD
```
This will run `nvm use 18` whenever Devin is in the `node18` repo and `nvm use 20` whenever Devin is in the `node20` repo.
### Configuring Environment Variables
[`direnv`](https://direnv.net/) is pre-installed on Devin's machine and can be used to manage environment variables per repository. The direnv hook is already configured in `~/.bashrc`.
To set up environment variables for a repository, create a `.envrc` file in the root of the repository. For example:
```bash theme={null}
export ENV_VAR=1
export ANOTHER_ENV_VAR=2
```
Finally, we'll run `direnv allow` in the terminal to load the environment variables.
Devin will now have the environment variables in our `.envrc` file added to its environment when working in our repository in future sessions.
We recommend adding `.envrc` to your `.gitignore` file so that Devin doesn't
accidentally commit it to the repository.
### Adding Directories to the System PATH
We can edit `~/.bashrc` to add directories to the system PATH. This will make it easier for Devin to run the executables in those directories. For example, we can append the following to `~/.bashrc` which will add the `~/bin` directory to the system PATH.
```bash theme={null}
export PATH="$HOME/bin:$PATH"
```
Now, Devin will be able to run the executables in the `~/bin` directory without having to specify the full path.
## Logging In to Websites
During environment setup, you can use the Browser tab to log in to any website that you want Devin to interact with. These session cookies will be stored in Devin's environment and will be available to Devin in future sessions. If you are using a website that times out your login frequently, you will also want to set Devin up with credentials in your [Secrets](/product-guides/secrets) dashboard.
### Scripted Browser Use via Playwright
For apps that require browser-based authentication (SSO, OAuth, etc.) or systematic data entry, Devin can write and run Playwright scripts to automate these flows against its own running browser. You can also write these scripts yourself and check them into your repo. Devin's Chrome browser exposes a **Chrome DevTools Protocol (CDP)** endpoint at `http://localhost:29229` that Playwright can connect to.
```python theme={null}
from playwright.sync_api import sync_playwright
with sync_playwright() as p:
browser = p.chromium.connect_over_cdp("http://localhost:29229")
context = browser.contexts[0]
page = context.pages[0] if context.pages else context.new_page()
# Automate your login flow here
page.goto("https://your-app.com/login")
page.fill('input[name="email"]', "user@example.com")
page.fill('input[name="password"]', "password")
page.click('button[type="submit"]')
page.wait_for_url("**/dashboard")
```
After the script runs, the authenticated session (cookies, localStorage, auth tokens) persists in Devin's browser. Devin can then refresh pages, navigate, and interact with the app normally — the login carries over.
Store login scripts in your repo's `.agents/skills/` directory and reference credentials via [Secrets](/product-guides/secrets) so that Devin can re-authenticate automatically in every session. See [Computer Use — Scripted Browser Use](/work-with-devin/computer-use#scripted-browser-use-via-playwright) for more details.
## Troubleshooting
### Why aren't my commands being verified?
If you run into an error when verifying one of the commands, try to inspect its output and also try to run the command yourself in a fresh terminal.
1. Check the path of the executable you are running. We strongly recommend either using absolute paths or [adding executables to the system PATH](#adding-directories-to-the-system-path).
2. Make sure you've installed the necessary tools and dependencies to run the command. If you haven't, use the Setup Agent or VSCode Terminal to install them, then verify again.
3. Check that the commands are being run in the right directory. If the commands need to run in a specific directory, you can use `cd` like so: `cd && `.
4. Check that you are using the **right language versions** (e.g. right versions of Node, Python, etc.).
5. You might want to **modify your `~/.bashrc`** to automatically use the right environment.
Check out our guide for an example of [how to use the right language version for different repositories](#configuring-environments-automatically-for-different-repositories).
### My commands work when I run them manually
Check that you've setup your bashrc so that a fresh bash shell has access to the necessary tools. Try running your commands in a fresh terminal. If they don't work, you will likely need to edit your bashrc, for example by running certain setup commands or editing the system PATH.
Check out our guide for an example of [how to use the right language version for different repositories](#configuring-environments-automatically-for-different-repositories).
Commands will timeout after 5 minutes. You can induce caching by running the commands in the VS Code terminal before verifying. We do not recommend giving Devin commands that take longer than 5 minutes to run, as it will significantly slow it down.
### Devin can't run my lint/test commands in sessions
Take a look at the output of Devin's terminal to see if you can spot any errors. You can also try running the commands yourself in a fresh terminal to see if they work. If needed, you can revisit the repository setup process to make changes to Devin's environment.
### The git pull step isn't working
Double check that Devin has access to the repository and submodules of the repository. Also check out the [GitHub Integration Documentation](/integrations/gh) if you run into any permission issues.
## All Done!
Congrats! You've onboarded Devin and can start building together. It's time to start [your first session](/get-started/first-run). Keep in mind that Devin works best when you:
* Tell Devin how to check its progress
* Break down big tasks
* Share detailed requirements upfront
* Run multiple sessions in parallel
If you need support please don't hesitate to drop us an email at [support@cognition.ai](mailto:support@cognition.ai).