> ## Documentation Index
> Fetch the complete documentation index at: https://docs.devinenterprise.com/llms.txt
> Use this file to discover all available pages before exploring further.
# GitHub Enterprise Server Integration
> Connect Devin with GitHub Enterprise Server or GitHub Enterprise Cloud with Data Residency
## Overview
Devin supports two methods for connecting to GitHub Enterprise Server (GHES) and GitHub Enterprise Cloud (GHEC) with Data Residency:
1. **GitHub App (Recommended)** — Register and install a dedicated GitHub App on your GHES or GHEC instance. This provides a streamlined setup experience and does not require managing personal access tokens.
2. **Personal Access Token (PAT)** — Create a service account and generate a fine-grained personal access token. This method works for all GHES versions.
The GitHub App integration is currently available on a limited basis. To get started, please contact your Cognition representative.
***
## GitHub App Setup
The GitHub App setup involves three steps:
1. **App Registration** — Register a GitHub App on your GHES or GHEC instance. You only need **one App registration per instance**.
2. **App Configuration** — Configure the registered App on your GHES or GHEC instance (e.g., make it public and opt out of token expiration).
3. **App Installation** — Install the registered App on each GitHub organization you want Devin to access. You need **one installation per organization**.
### Prerequisites
* A Devin user with **Manage git permissions**
* Owner or admin access to the GitHub organization where the App will be registered
### Step 1: Register the GitHub App
1. In your Devin account, navigate to **Enterprise Settings** → **Integrations** → **GitHub**.
2. Expand the **Advanced** section to reveal the **GitHub Enterprise** options.
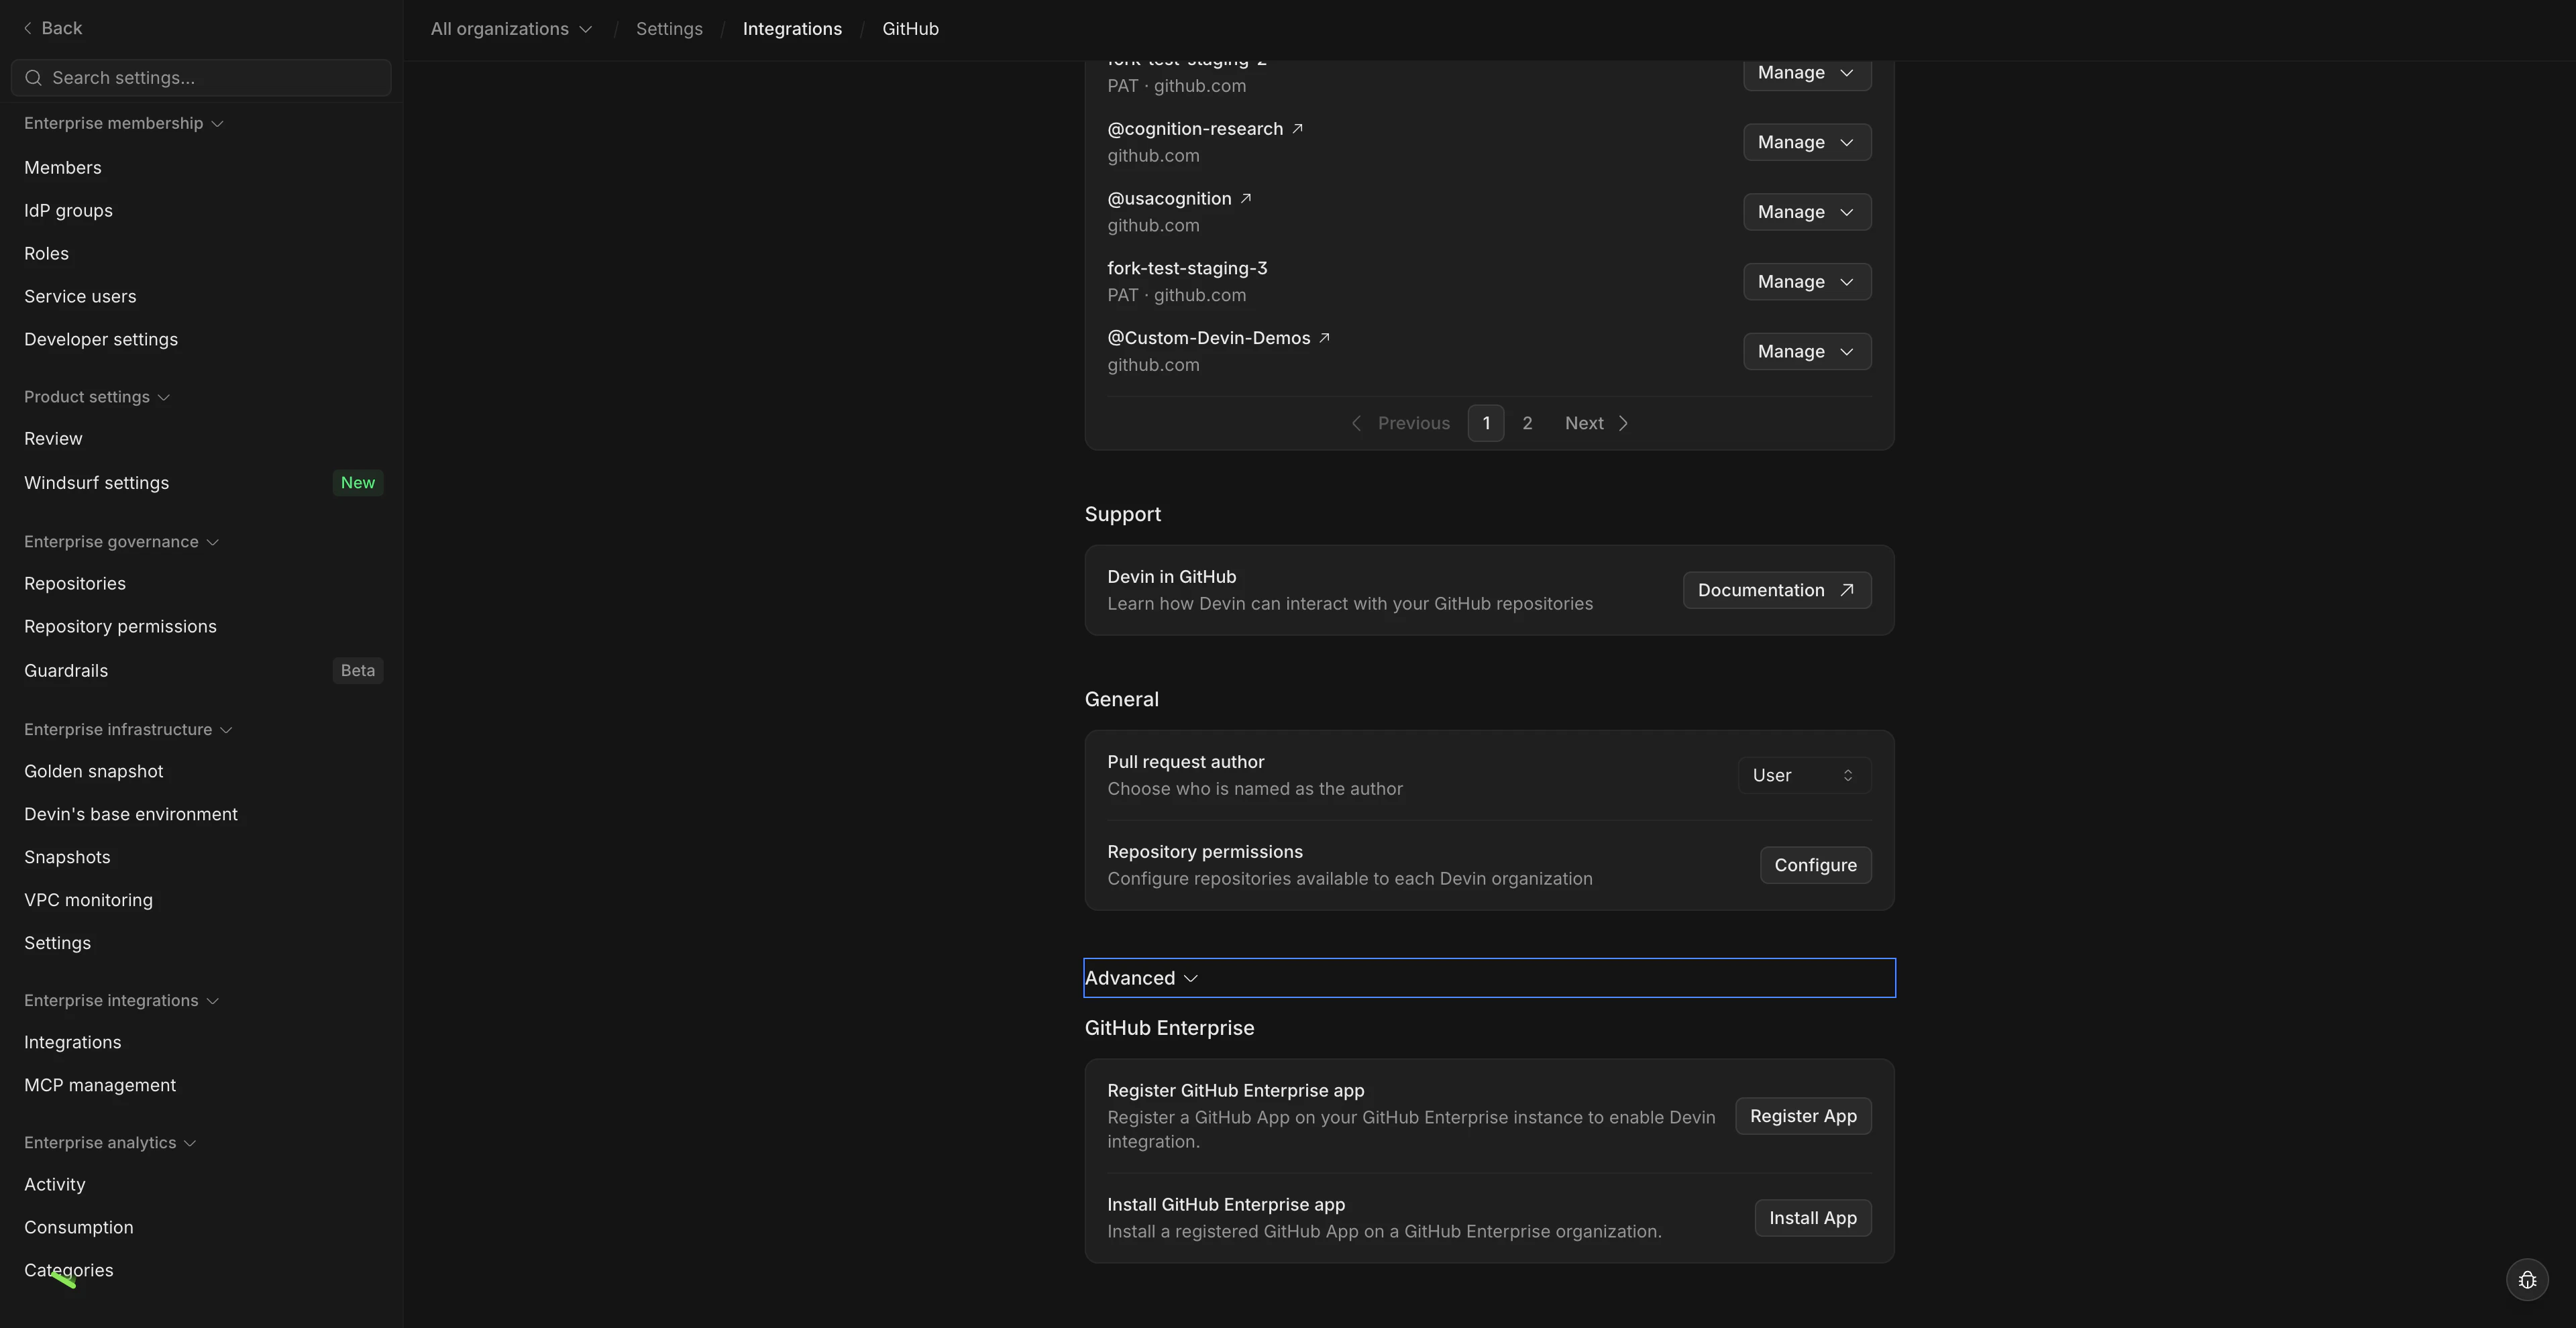 3. Click **Register App**.
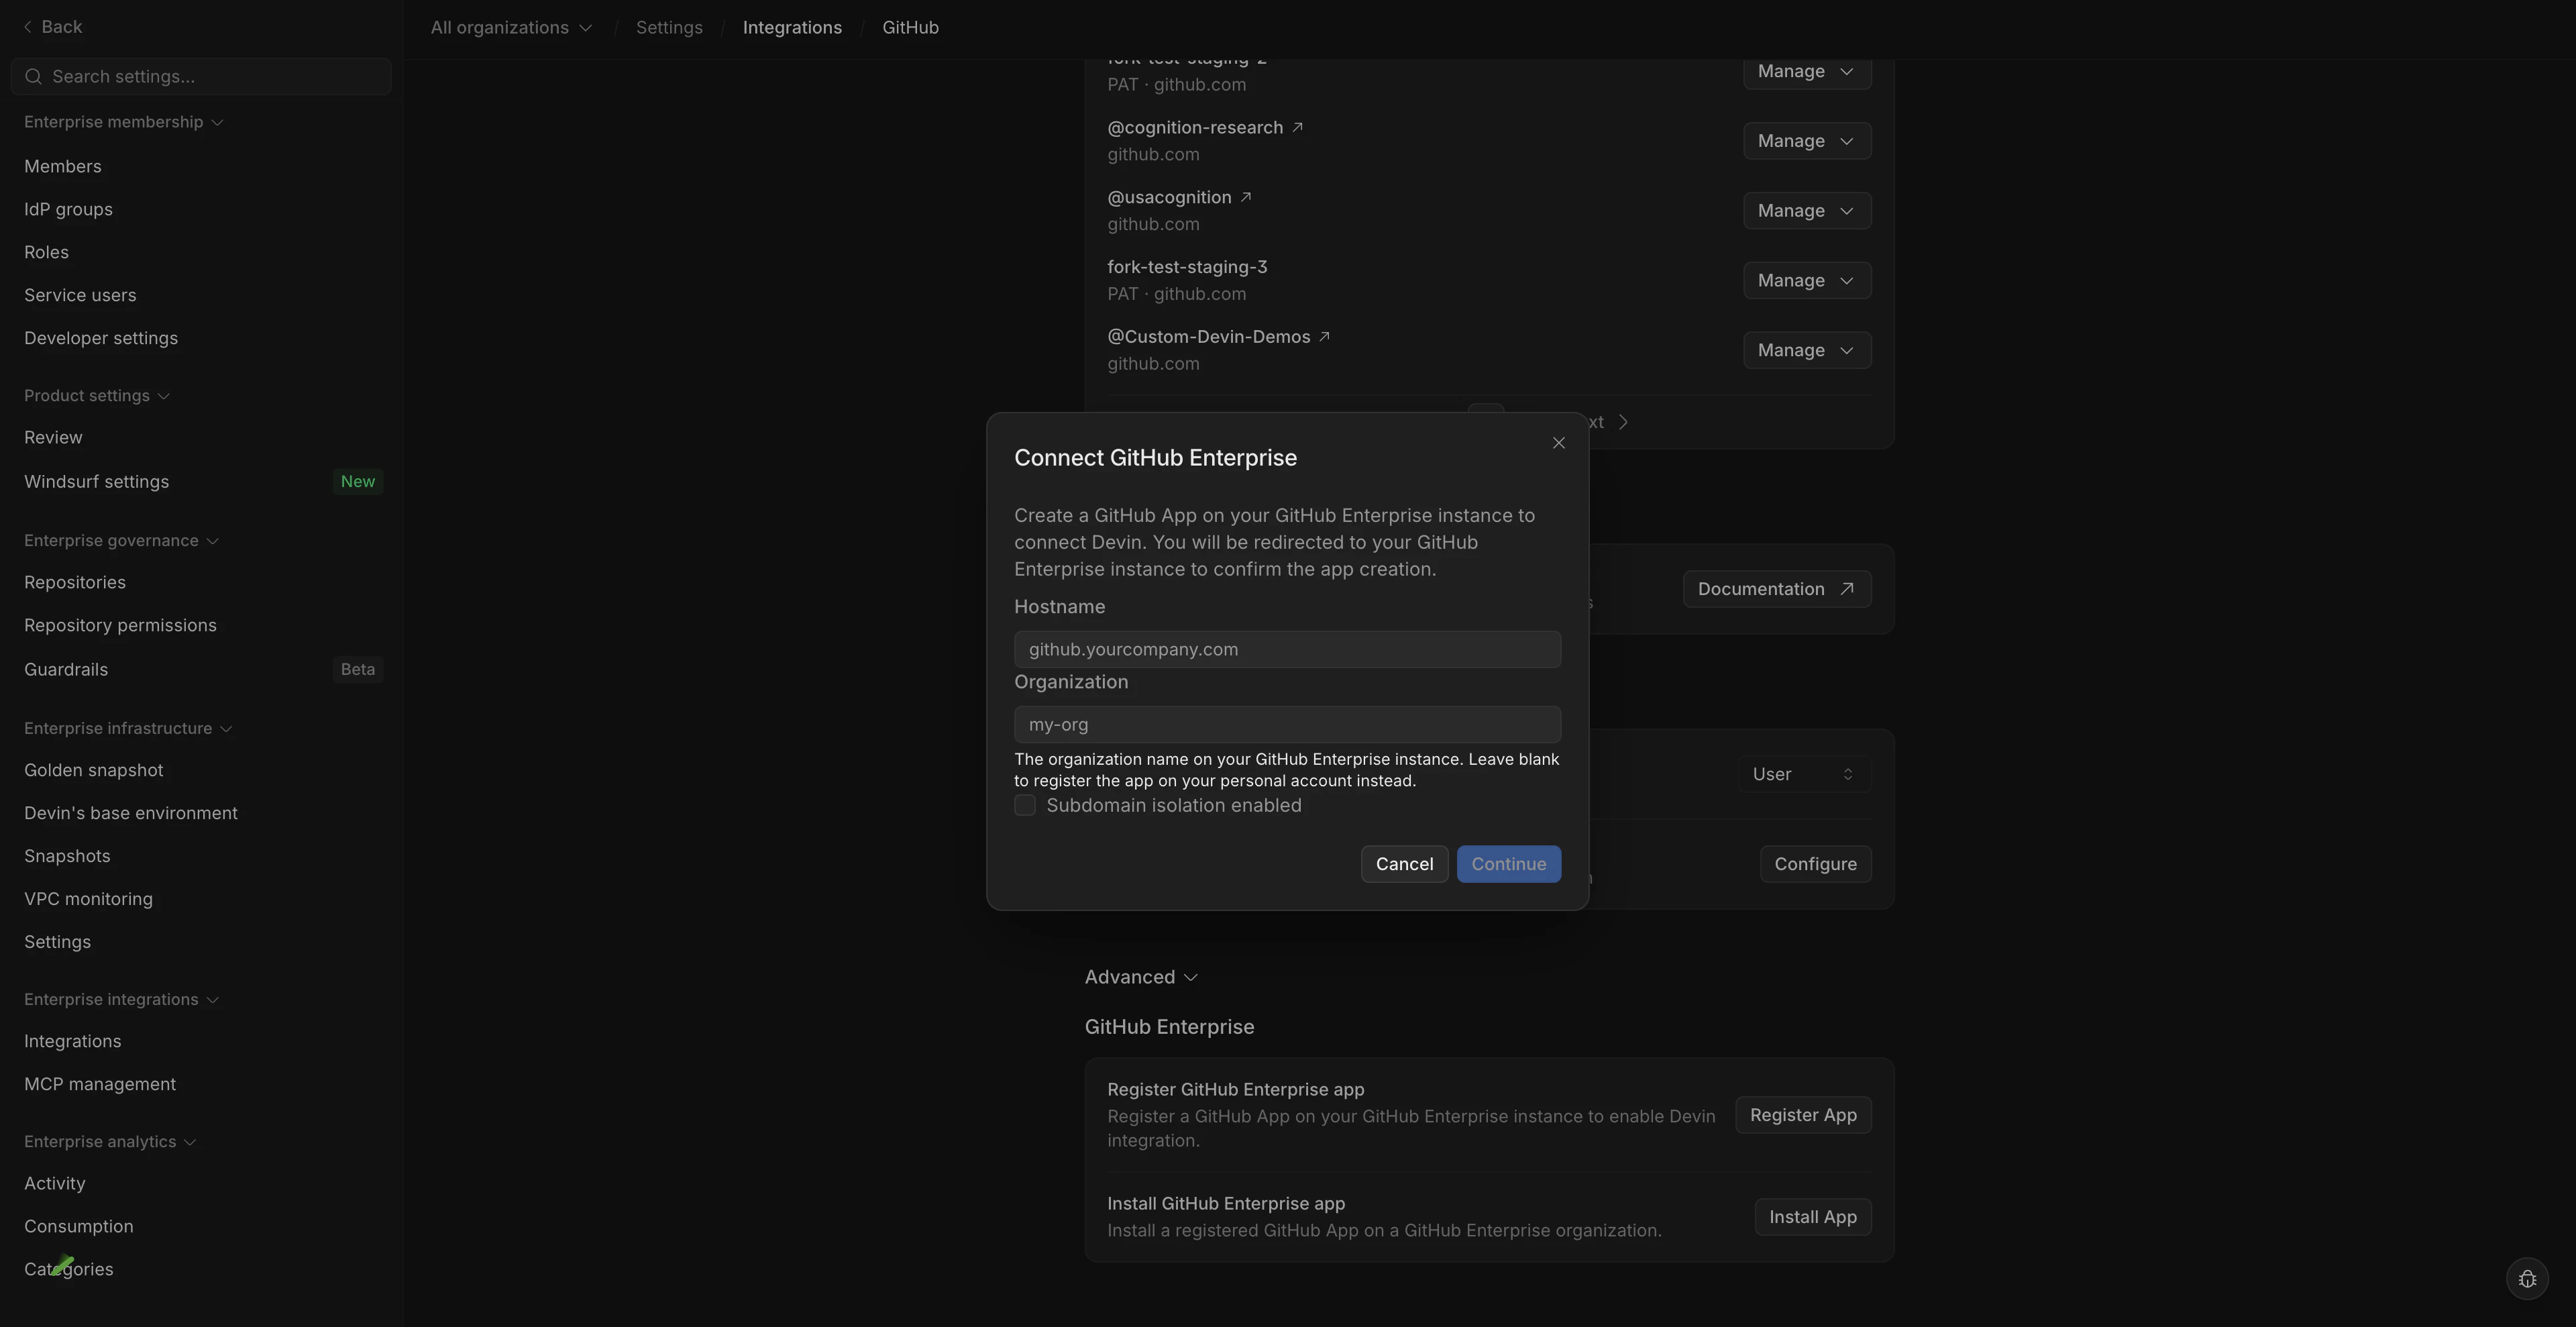
4. In the modal that appears, enter the **hostname** of your GHES or GHEC instance and the **organization** where the App will be registered.
3. Click **Register App**.
4. In the modal that appears, enter the **hostname** of your GHES or GHEC instance and the **organization** where the App will be registered.
 5. You will be redirected to GitHub. Click **Register App** to complete the registration.
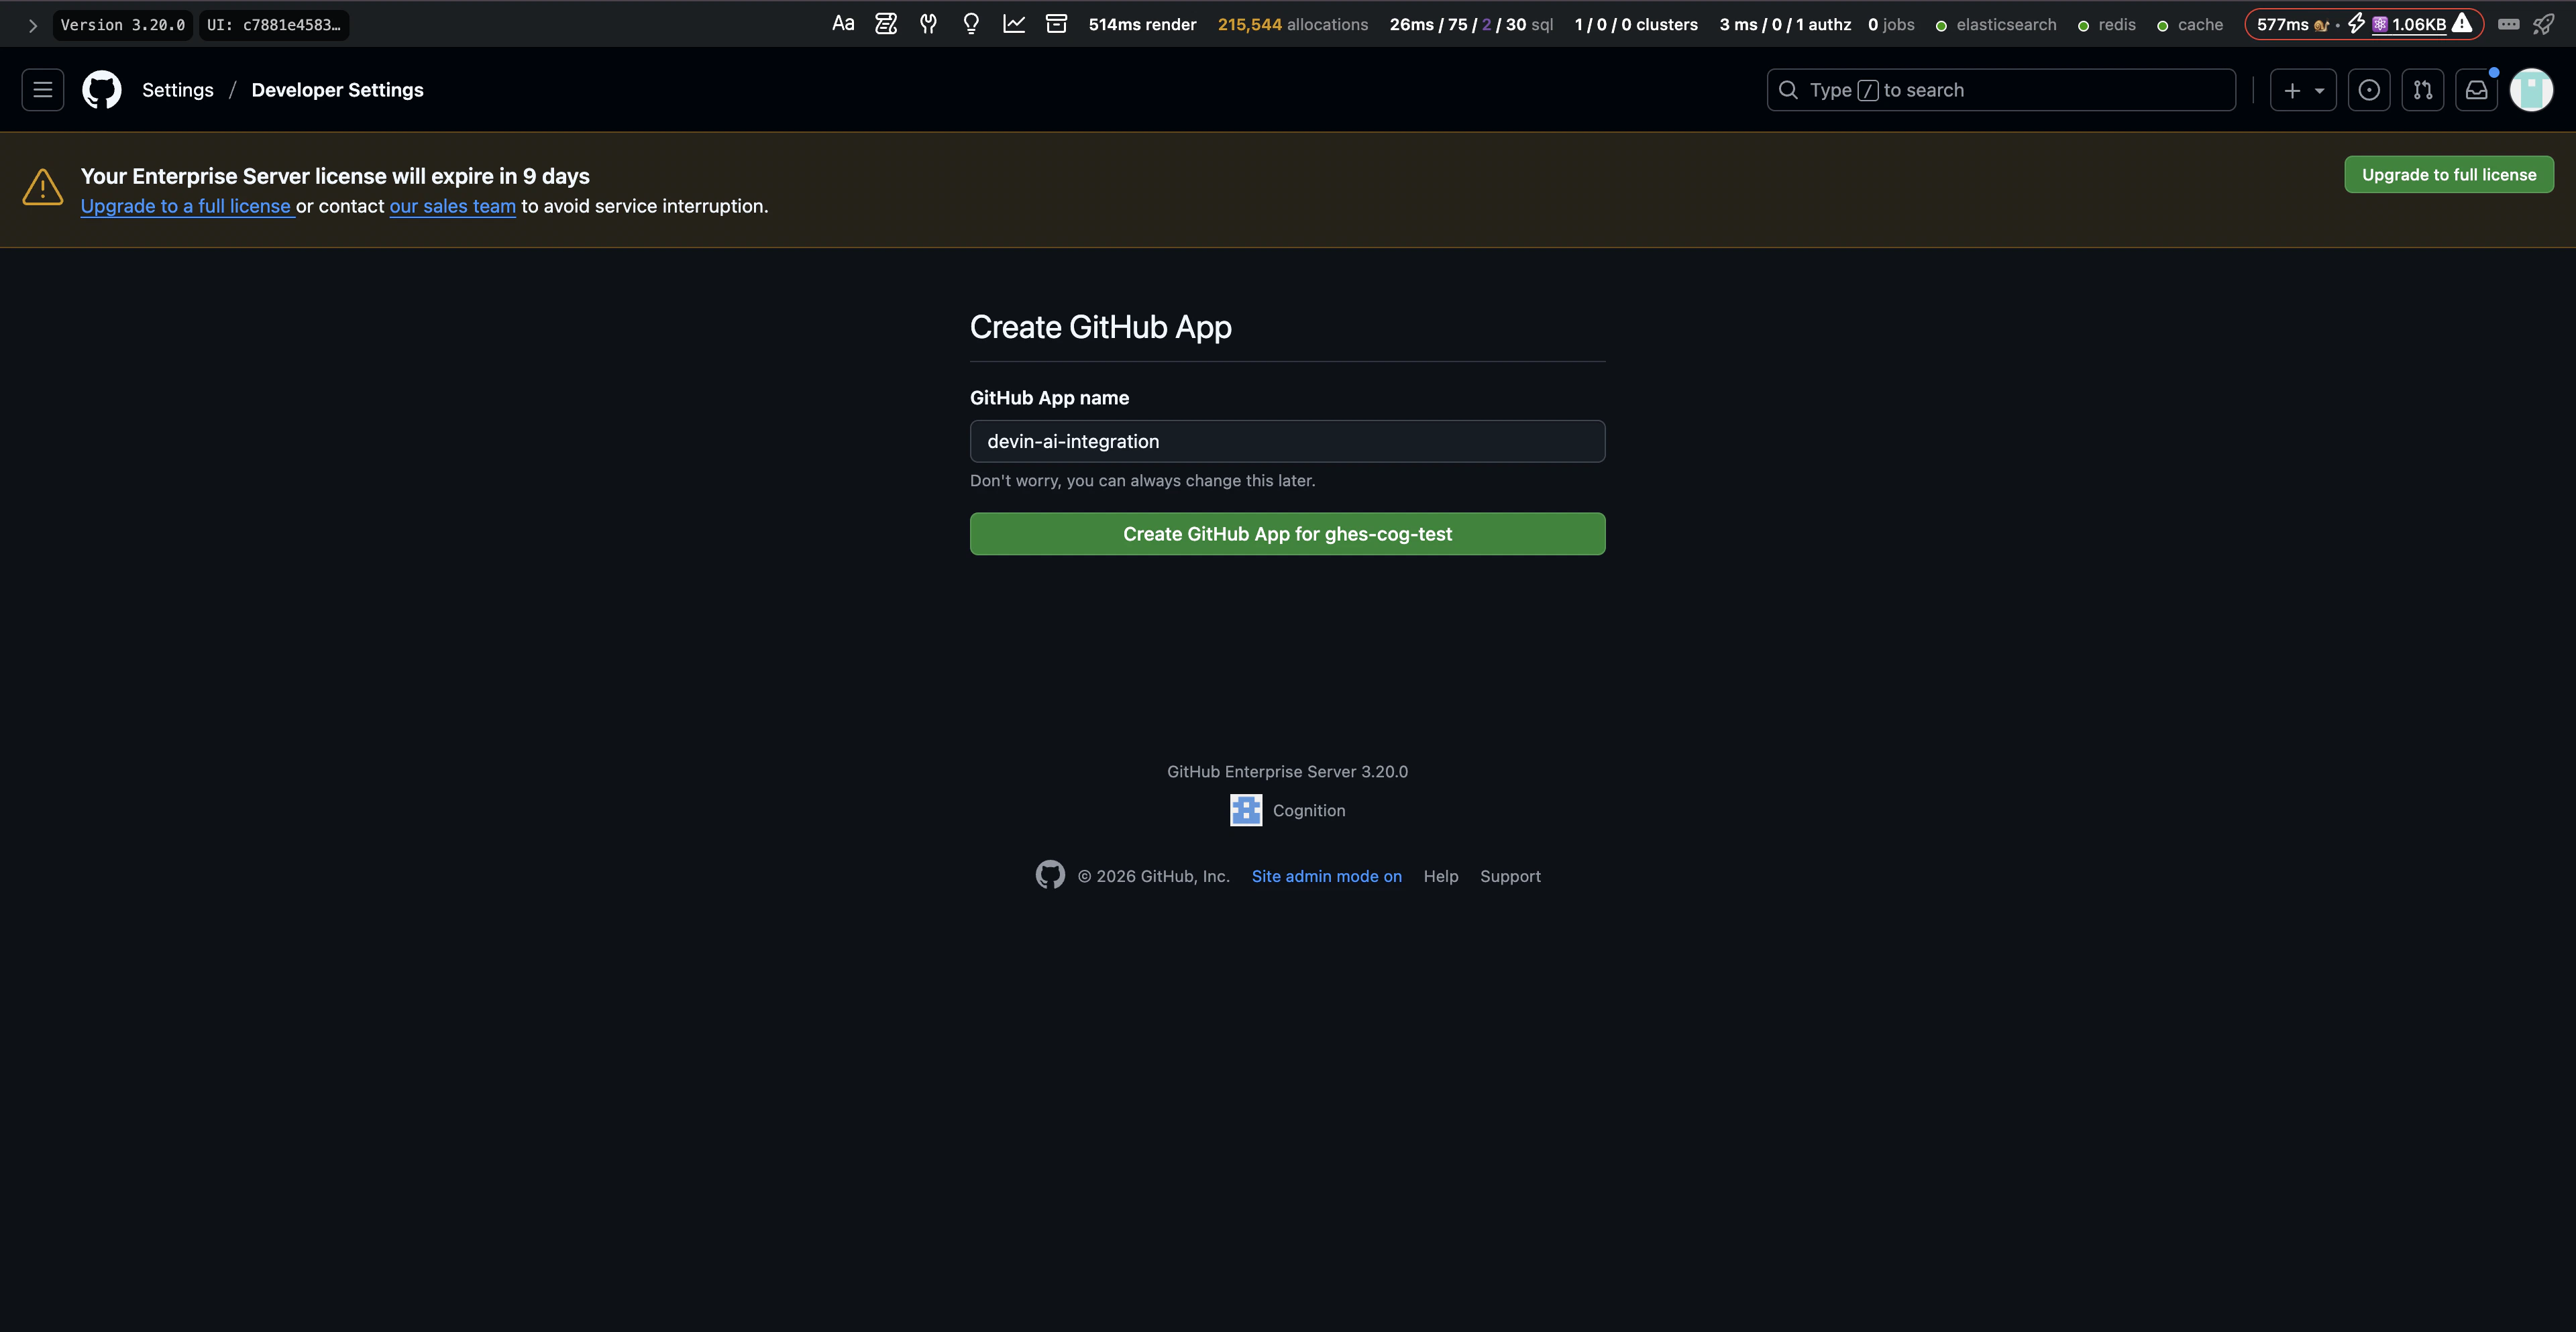 6. After being redirected back to Devin, the GitHub App is now registered in your GitHub organization.
### Step 2: Configure the GitHub App
After registration, configure the App on your GHES or GHEC instance:
1. On your GHES or GHEC instance, navigate to the GitHub organization specified during registration.
2. Go to **Settings** → **Developer Settings** → **GitHub Apps** and select the Devin App.
6. After being redirected back to Devin, the GitHub App is now registered in your GitHub organization.
### Step 2: Configure the GitHub App
After registration, configure the App on your GHES or GHEC instance:
1. On your GHES or GHEC instance, navigate to the GitHub organization specified during registration.
2. Go to **Settings** → **Developer Settings** → **GitHub Apps** and select the Devin App.
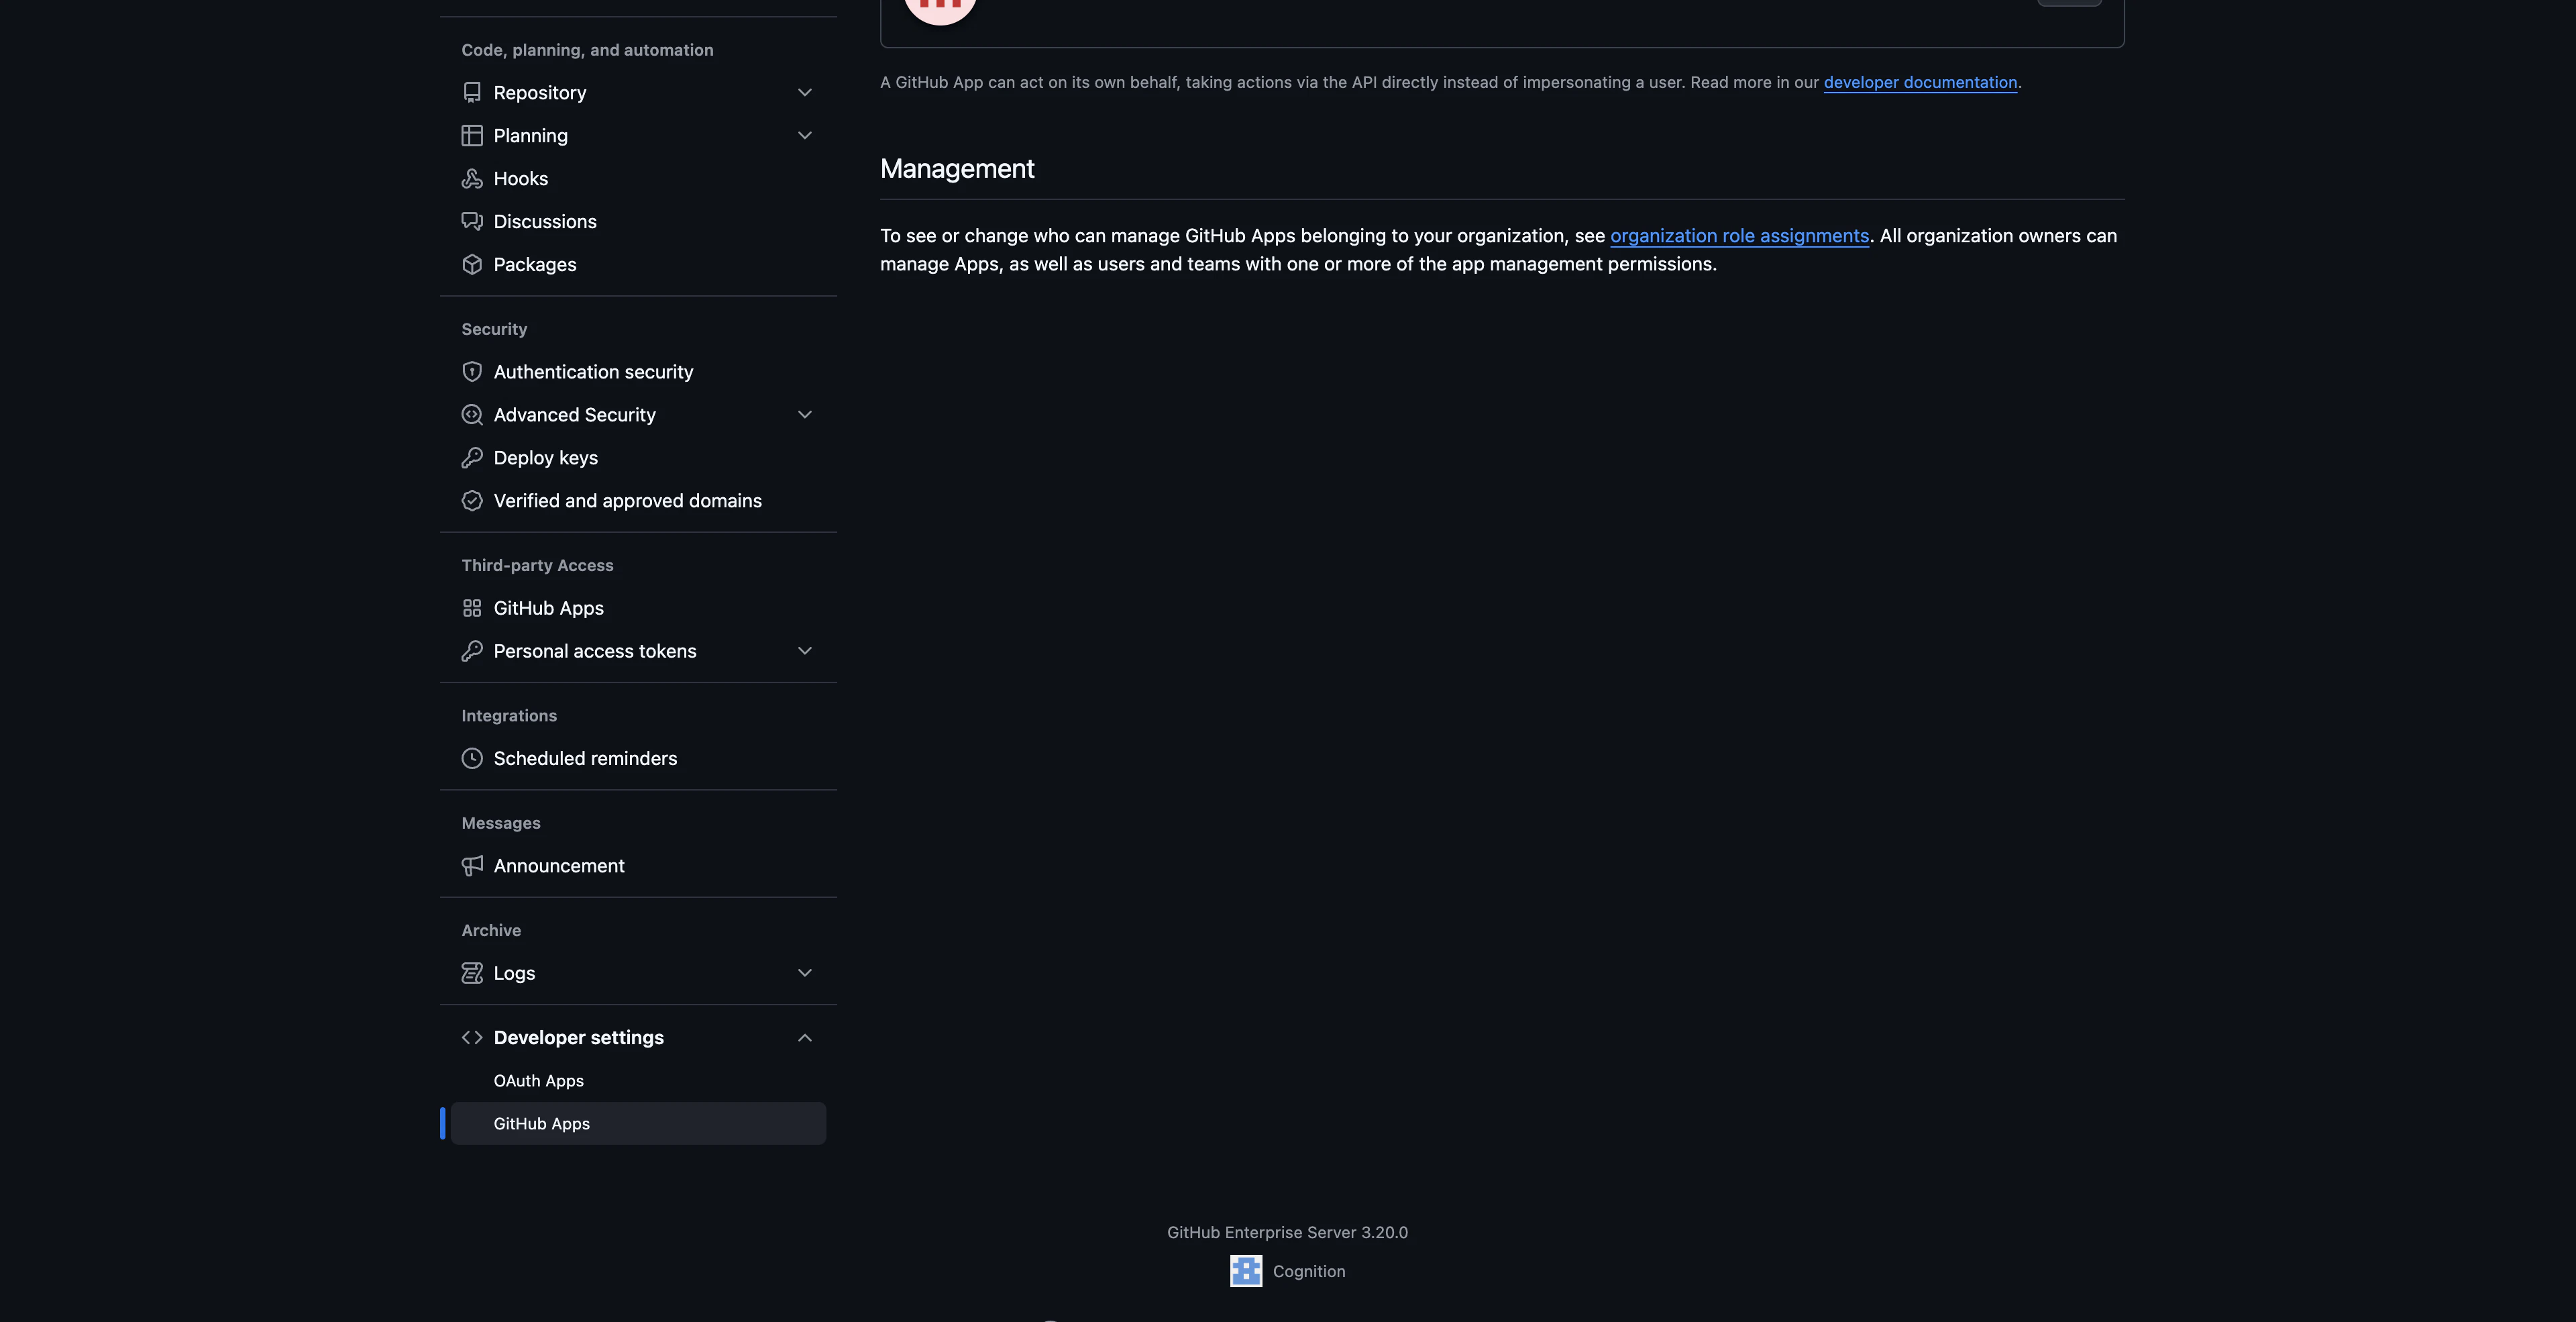 3. In the **Advanced** section, under **Danger zone**, click **Make public**. This allows the App to be installed across other organizations on the same instance.
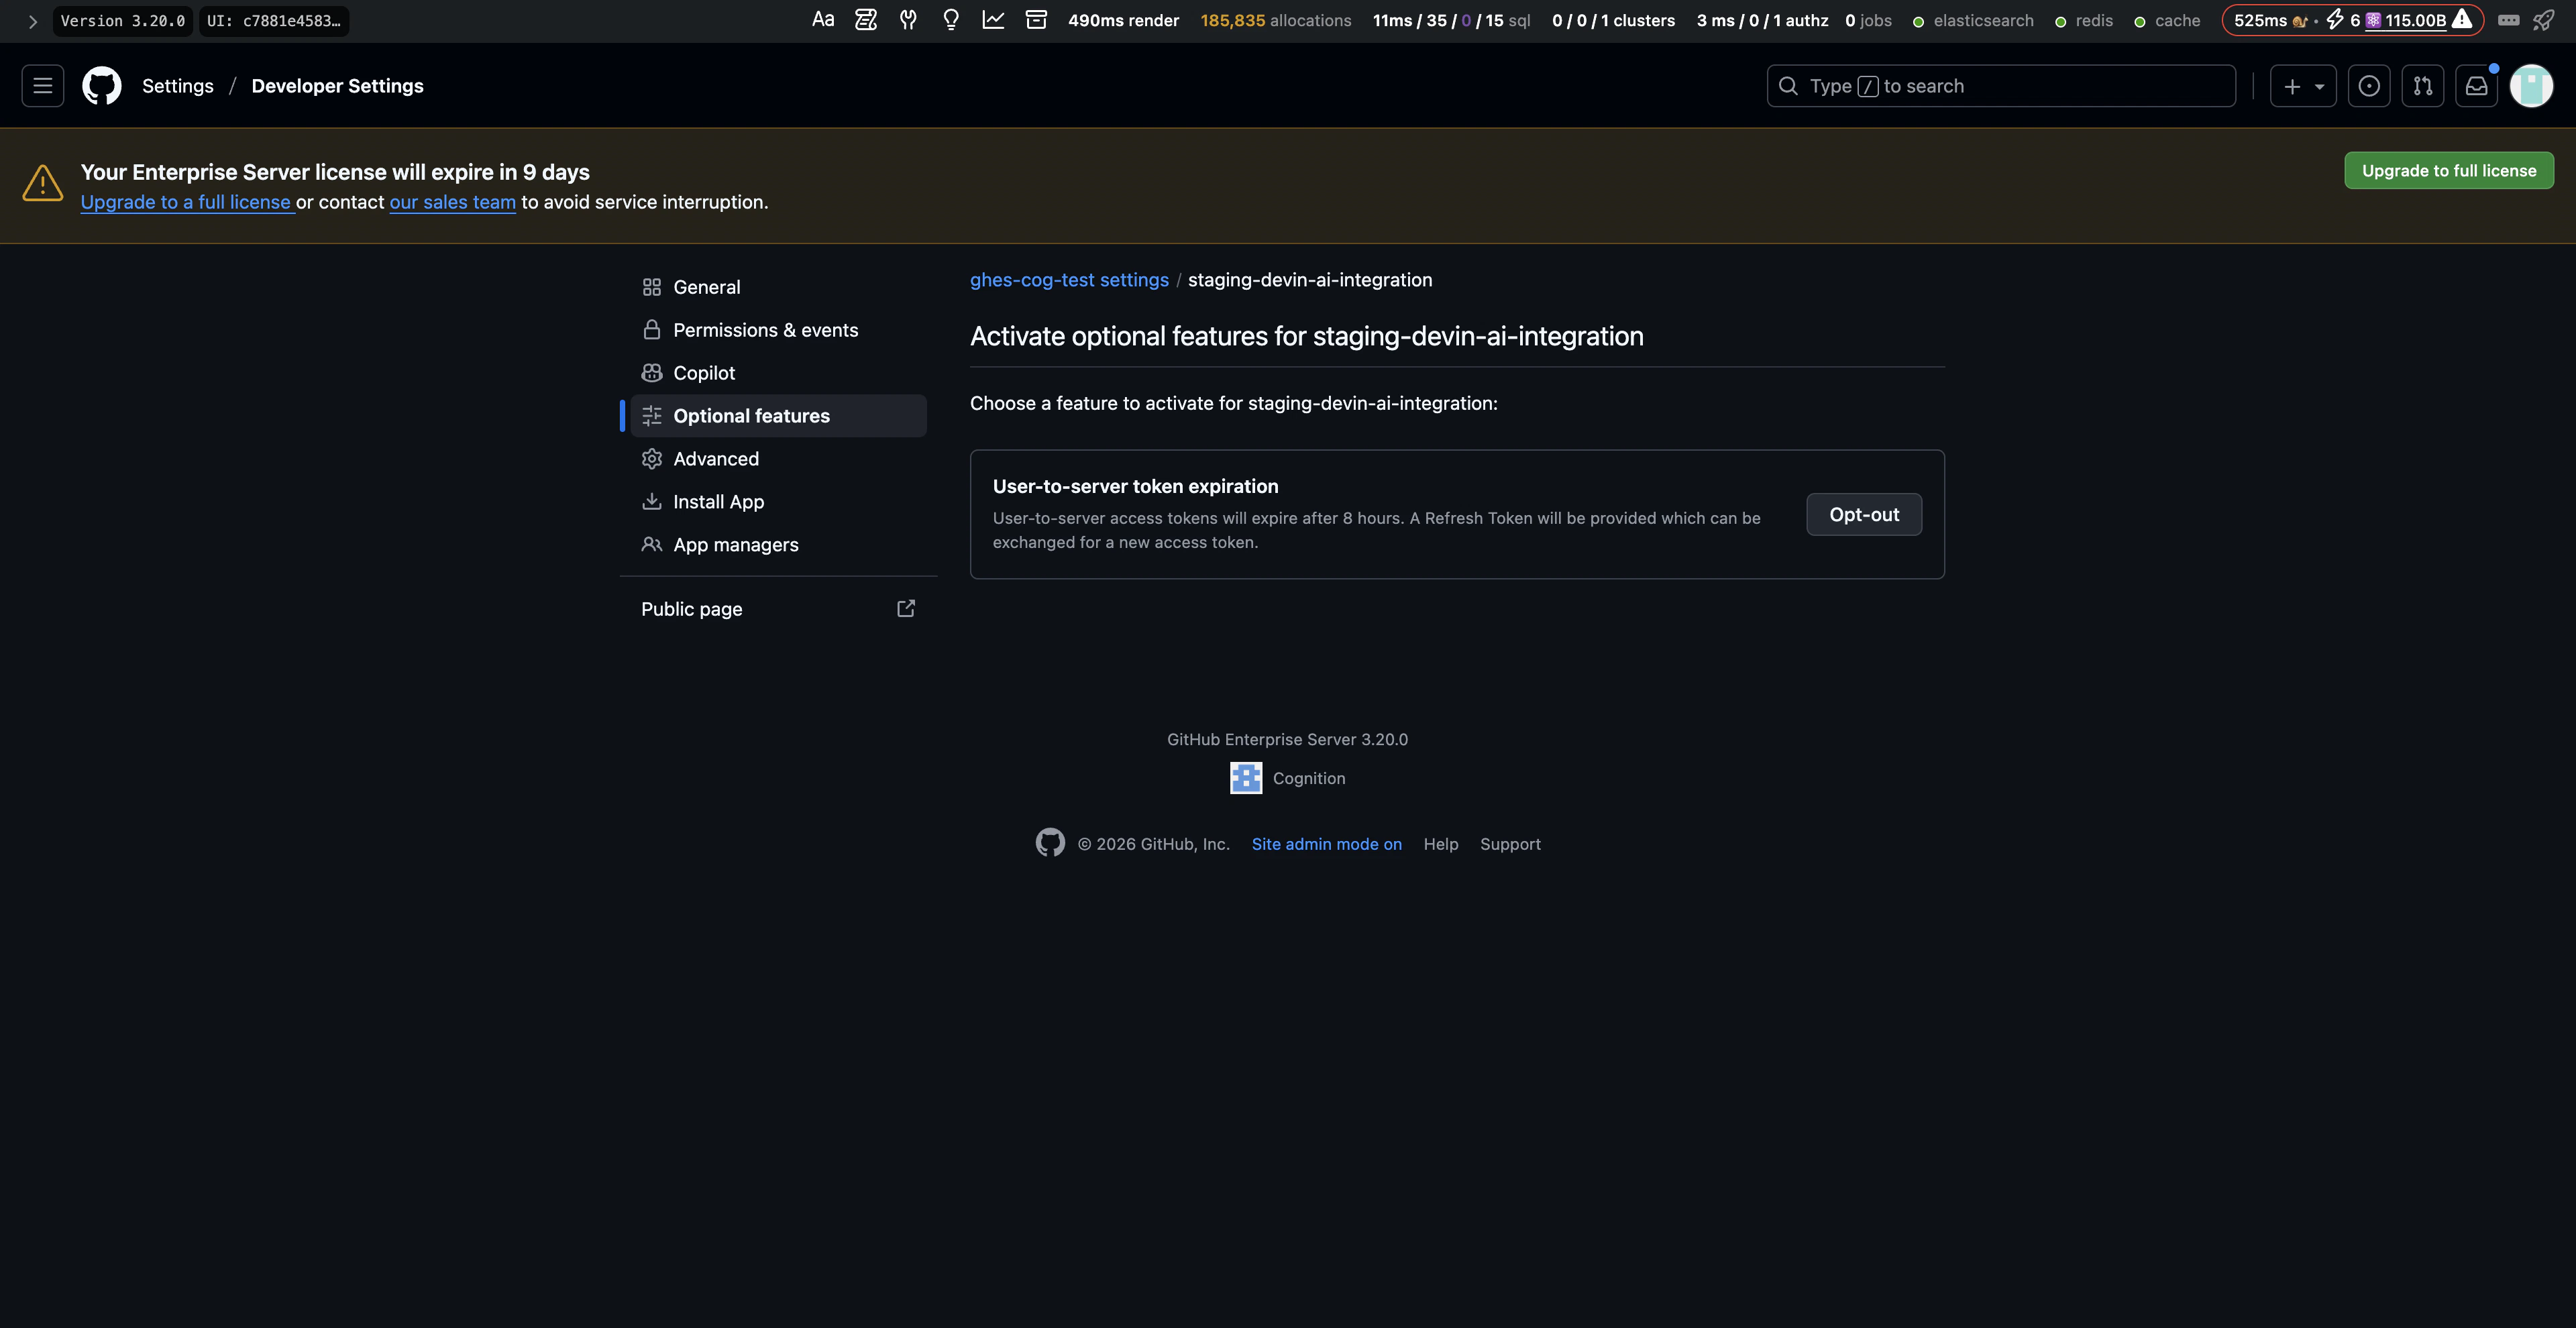
4. Navigate to the **Optional features** section and opt out of **User-to-server token expiration**. This prevents access tokens from expiring and avoids the need for users to re-authorize the App periodically.
3. In the **Advanced** section, under **Danger zone**, click **Make public**. This allows the App to be installed across other organizations on the same instance.
4. Navigate to the **Optional features** section and opt out of **User-to-server token expiration**. This prevents access tokens from expiring and avoids the need for users to re-authorize the App periodically.
 ### Step 3: Install the GitHub App
1. In your Devin account, navigate to **Enterprise Settings** → **Integrations** → **GitHub**.
2. Expand the **Advanced** section and click **Install App**.
3. In the modal, select the GitHub App registered under your GHES or GHEC instance.
### Step 3: Install the GitHub App
1. In your Devin account, navigate to **Enterprise Settings** → **Integrations** → **GitHub**.
2. Expand the **Advanced** section and click **Install App**.
3. In the modal, select the GitHub App registered under your GHES or GHEC instance.
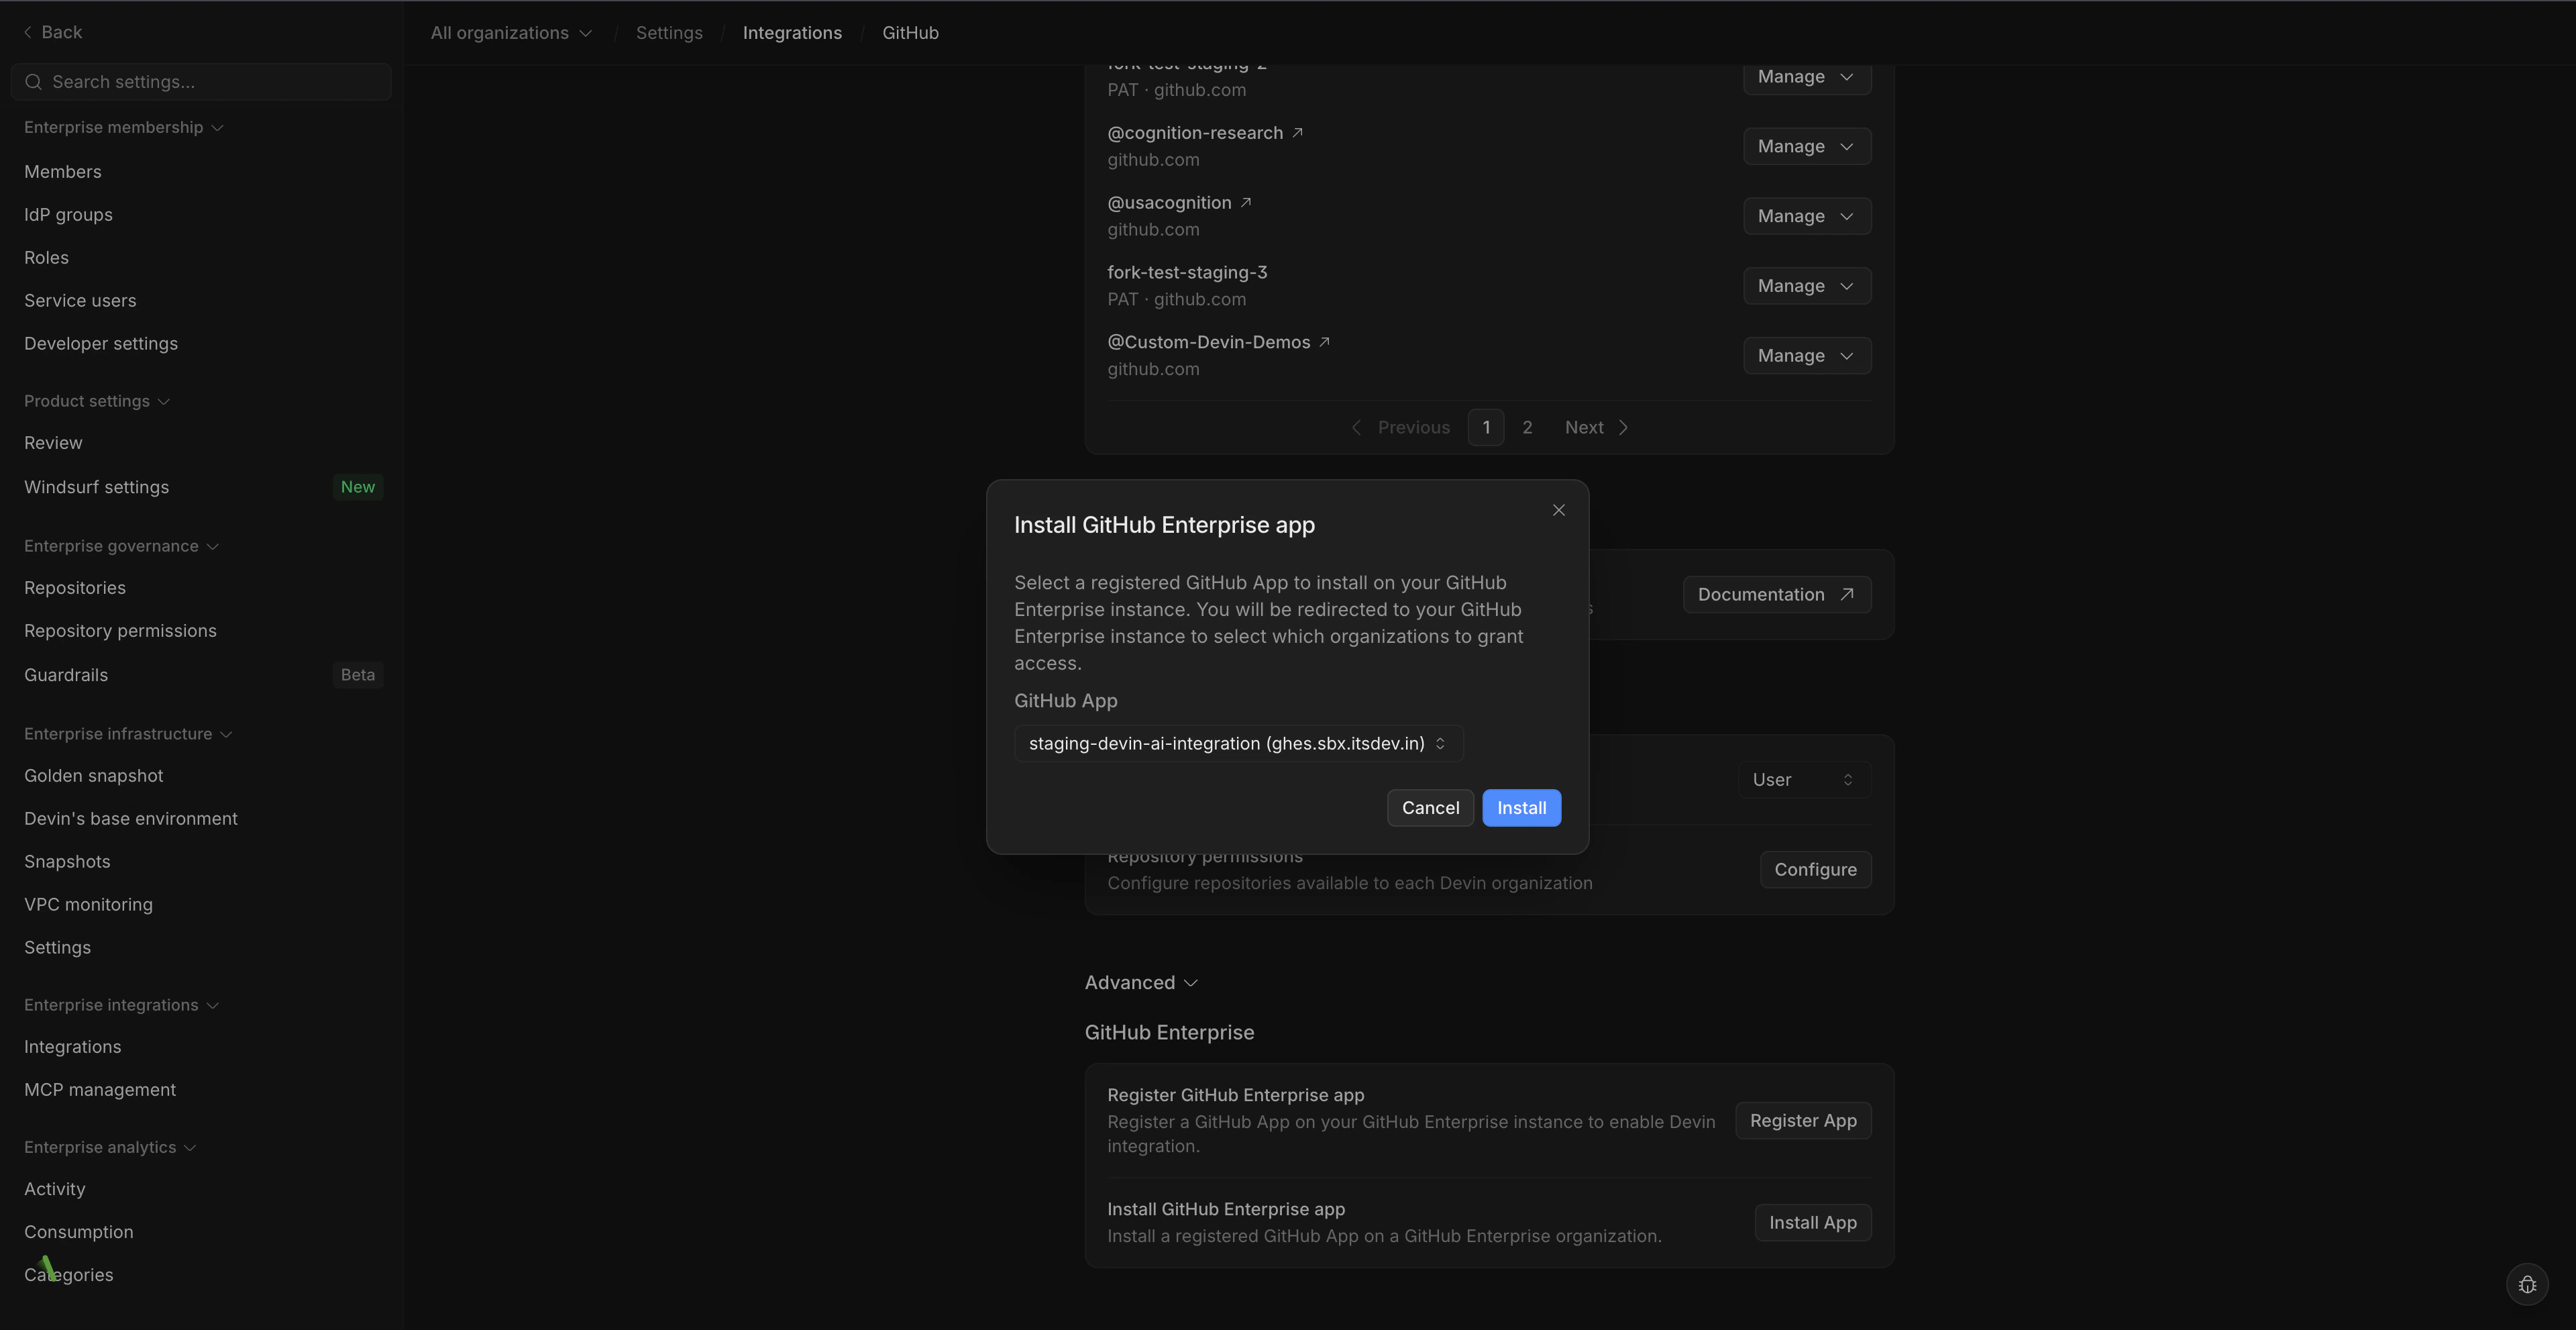 4. You will be redirected to GitHub, where you can choose a GitHub organization and select which repositories to grant Devin access to. We recommend granting access to **all repositories**.
5. After completing the installation, you will be redirected back to Devin. A new git connection will appear in **Settings** → **Integrations** → **GitHub**.
Repeat this step for each additional GitHub organization you want to connect.
### Troubleshooting
If you encounter issues during the GitHub App registration or installation process, please contact your Cognition representative or reach out to [enterprise@cognition.ai](mailto:enterprise@cognition.ai).
***
## Personal Access Token Setup
Integrating Devin into your GitHub allows Devin to access your repos and create pull requests. This lets Devin be a true collaborator on your engineering team.
### **Create a Service Account for Devin**
1. Within your GitHub Enterprise, create a new GitHub account for Devin to use. This is important to ensure all of Devin's access and usage can be properly tracked and managed.
2. Add the newly created service account to all relevant GitHub organizations as a **Member**. Verify that the account has access to all of the repositories that Devin is expected to access.
### **Generate a Personal Access Token for Devin**
1. While logged into the service account, click on the profile picture in the upper-right corner, then click **Settings**.
2. In the left sidebar, click **Developer settings**.
3. In the left sidebar, under **Personal access tokens**, click **Fine-grained tokens**.
4. Click **Generate new token**.
5. Add the **Token name** and **Expiration**.\
**Note:** When the token expires, Devin will immediately lose all access to GitHub and a new token will need to be created.
6. Under **Resource owner**, select the correct organization.
If you're not seeing the correct organization under "Resource owner", make sure that the enterprise and organization have enabled the use of fine-grained personal access tokens.
#### **Enabling in Enterprise Settings**
Only Enterprise Admins will be able to update these settings. Make sure that personal access tokens are also enabled in the specific organization settings.
1. In the top-right corner of GitHub Enterprise Server, click your profile picture, then click **Enterprise settings**.
2. At the top of the page, click **Policies**.
3. Under **Policies**, click **Personal access tokens**.
4. Select the **Fine-grained tokens** tab.
5. Under **Fine-grained personal access tokens**, enable access.
6. Click **Save**.
#### **Enabling in Organization Settings**
Only Organization Admins will be able to update these settings. Make sure that personal access tokens are also enabled in the enterprise settings.
1. In the upper-right corner of GitHub, click your profile picture, then click **Organizations**.
2. Next to the organization, click **Settings**.
3. In the left sidebar, under **Personal access tokens**, click **Settings**.
4. Select the **Fine-grained tokens** tab.
5. Under **Fine-grained personal access tokens**, enable access for your organization.
6. Click **Save**.
7. Under **Repository access**, select which repositories you want Devin to work with. Tokens always include read-only access to all public repositories on GitHub.
8. Make sure the token has the following permissions which are required for Devin to work properly:
| Permission | Access level | Description |
| :------------ | :------------- | :-------------------------------------------------------------------------- |
| Contents | Read and write | Allow Devin to contribute to the codebase |
| Issues | Read and write | Allow Devin to open new issues |
| Metadata | Read only | Allow Devin to view crucial metadata about a repository such as who owns it |
| Pull requests | Read and write | Allow Devin to create new PRs |
Additional permissions will help Devin better collaborate with your team depending on what work you're asking Devin to do.
9. Click **Generate Token** and save the token that is displayed.\
**Note:** Admin approval may be needed depending on your GitHub settings.
10. To validate that the token has all the necessary access and permissions, **create and push a test branch** on your local machine to a repository in the organization.
11. Once the token has been generated and tested, reach out to your Cognition point of contact to finish the setup process. If you are not currently working directly with our team, reach out to [enterprise@cognition.ai](mailto:enterprise@cognition.ai).
### **Validating PAT Permissions Locally**
Before sharing the token with Cognition, verify that it has the correct permissions by pushing a test branch:
```bash theme={null}
# Authenticate with gh CLI using your token
export GH_TOKEN=your_personal_access_token
export GH_HOST=your-github-enterprise-server.com
# Clone the repository
gh repo clone your-organization/your-repository
cd your-repository
# Create a test branch
git checkout -b test-devin-token-$(date +%s)
# Make a small change
echo "# Test" >> TEST.md
git add TEST.md
git commit -m "Test: Validate Devin token permissions"
# Push the branch (tests contents write permission)
git push origin HEAD
# Create a pull request (tests pull requests write permission)
gh pr create --title "Test: Validate Devin token permissions" \
--body "This is a test PR to validate token permissions." \
--base main
# Clean up: close the test PR and delete the test branch
gh pr close pr-number --delete-branch
```
**Expected results:** The push and PR creation should succeed without authentication errors. If the push fails, verify the token has "Contents: Read and write" permission. If the PR creation fails, verify the token has "Pull requests: Read and write" permission.
## **Using Devin with the GitHub Integration**
Now that GitHub is integrated, you can configure which Devin sub-organizations have access to each repository (see [Repository Permissions](/enterprise/integrations/git-integrations#repository-permissions))
Once the integration is set up, you can go to the Devin web application and you are now able to @mention any repository in your prompt!
If you are using a repository for the first time, we recommend going through the [development environment setup process in the onboarding flow](/onboard-devin/environment) to ensure that Devin has the most accurate and up to date information about working with your codebase.
Devin will automatically respond to any PR comments as long as the session has not been archived
### **Security Considerations**
Some additional information regarding Devin's permissions in GitHub:
* We recommend enabling branch protections on master to ensure checks are enforced before Devin can merge any changes.
* If Devin is connected to your organization's GitHub account then it will have the same permissions for any user with access to the GitHub and Devin organizations.
* Devin will not mirror the permissions of the user running a session with Devin, it will retain the permissions granted at the org-level.
* Devin cannot create new repos in your GitHub account.
4. You will be redirected to GitHub, where you can choose a GitHub organization and select which repositories to grant Devin access to. We recommend granting access to **all repositories**.
5. After completing the installation, you will be redirected back to Devin. A new git connection will appear in **Settings** → **Integrations** → **GitHub**.
Repeat this step for each additional GitHub organization you want to connect.
### Troubleshooting
If you encounter issues during the GitHub App registration or installation process, please contact your Cognition representative or reach out to [enterprise@cognition.ai](mailto:enterprise@cognition.ai).
***
## Personal Access Token Setup
Integrating Devin into your GitHub allows Devin to access your repos and create pull requests. This lets Devin be a true collaborator on your engineering team.
### **Create a Service Account for Devin**
1. Within your GitHub Enterprise, create a new GitHub account for Devin to use. This is important to ensure all of Devin's access and usage can be properly tracked and managed.
2. Add the newly created service account to all relevant GitHub organizations as a **Member**. Verify that the account has access to all of the repositories that Devin is expected to access.
### **Generate a Personal Access Token for Devin**
1. While logged into the service account, click on the profile picture in the upper-right corner, then click **Settings**.
2. In the left sidebar, click **Developer settings**.
3. In the left sidebar, under **Personal access tokens**, click **Fine-grained tokens**.
4. Click **Generate new token**.
5. Add the **Token name** and **Expiration**.\
**Note:** When the token expires, Devin will immediately lose all access to GitHub and a new token will need to be created.
6. Under **Resource owner**, select the correct organization.
If you're not seeing the correct organization under "Resource owner", make sure that the enterprise and organization have enabled the use of fine-grained personal access tokens.
#### **Enabling in Enterprise Settings**
Only Enterprise Admins will be able to update these settings. Make sure that personal access tokens are also enabled in the specific organization settings.
1. In the top-right corner of GitHub Enterprise Server, click your profile picture, then click **Enterprise settings**.
2. At the top of the page, click **Policies**.
3. Under **Policies**, click **Personal access tokens**.
4. Select the **Fine-grained tokens** tab.
5. Under **Fine-grained personal access tokens**, enable access.
6. Click **Save**.
#### **Enabling in Organization Settings**
Only Organization Admins will be able to update these settings. Make sure that personal access tokens are also enabled in the enterprise settings.
1. In the upper-right corner of GitHub, click your profile picture, then click **Organizations**.
2. Next to the organization, click **Settings**.
3. In the left sidebar, under **Personal access tokens**, click **Settings**.
4. Select the **Fine-grained tokens** tab.
5. Under **Fine-grained personal access tokens**, enable access for your organization.
6. Click **Save**.
7. Under **Repository access**, select which repositories you want Devin to work with. Tokens always include read-only access to all public repositories on GitHub.
8. Make sure the token has the following permissions which are required for Devin to work properly:
| Permission | Access level | Description |
| :------------ | :------------- | :-------------------------------------------------------------------------- |
| Contents | Read and write | Allow Devin to contribute to the codebase |
| Issues | Read and write | Allow Devin to open new issues |
| Metadata | Read only | Allow Devin to view crucial metadata about a repository such as who owns it |
| Pull requests | Read and write | Allow Devin to create new PRs |
Additional permissions will help Devin better collaborate with your team depending on what work you're asking Devin to do.
9. Click **Generate Token** and save the token that is displayed.\
**Note:** Admin approval may be needed depending on your GitHub settings.
10. To validate that the token has all the necessary access and permissions, **create and push a test branch** on your local machine to a repository in the organization.
11. Once the token has been generated and tested, reach out to your Cognition point of contact to finish the setup process. If you are not currently working directly with our team, reach out to [enterprise@cognition.ai](mailto:enterprise@cognition.ai).
### **Validating PAT Permissions Locally**
Before sharing the token with Cognition, verify that it has the correct permissions by pushing a test branch:
```bash theme={null}
# Authenticate with gh CLI using your token
export GH_TOKEN=your_personal_access_token
export GH_HOST=your-github-enterprise-server.com
# Clone the repository
gh repo clone your-organization/your-repository
cd your-repository
# Create a test branch
git checkout -b test-devin-token-$(date +%s)
# Make a small change
echo "# Test" >> TEST.md
git add TEST.md
git commit -m "Test: Validate Devin token permissions"
# Push the branch (tests contents write permission)
git push origin HEAD
# Create a pull request (tests pull requests write permission)
gh pr create --title "Test: Validate Devin token permissions" \
--body "This is a test PR to validate token permissions." \
--base main
# Clean up: close the test PR and delete the test branch
gh pr close pr-number --delete-branch
```
**Expected results:** The push and PR creation should succeed without authentication errors. If the push fails, verify the token has "Contents: Read and write" permission. If the PR creation fails, verify the token has "Pull requests: Read and write" permission.
## **Using Devin with the GitHub Integration**
Now that GitHub is integrated, you can configure which Devin sub-organizations have access to each repository (see [Repository Permissions](/enterprise/integrations/git-integrations#repository-permissions))
Once the integration is set up, you can go to the Devin web application and you are now able to @mention any repository in your prompt!
If you are using a repository for the first time, we recommend going through the [development environment setup process in the onboarding flow](/onboard-devin/environment) to ensure that Devin has the most accurate and up to date information about working with your codebase.
Devin will automatically respond to any PR comments as long as the session has not been archived
### **Security Considerations**
Some additional information regarding Devin's permissions in GitHub:
* We recommend enabling branch protections on master to ensure checks are enforced before Devin can merge any changes.
* If Devin is connected to your organization's GitHub account then it will have the same permissions for any user with access to the GitHub and Devin organizations.
* Devin will not mirror the permissions of the user running a session with Devin, it will retain the permissions granted at the org-level.
* Devin cannot create new repos in your GitHub account.